After creating my video about using Twitter for professional development, I had many members of my PLN asking how I did it. The short answer is "hard work and problem solving". The long answer is me writing a blog post about it, so... here it is.
(Also, you're welcome, Dean Shareski... I've finally done my homework.)
Here is the video below, if you're interested in watching it before reading the rest of this post on how I created it:
(Also, you're welcome, Dean Shareski... I've finally done my homework.)
Here is the video below, if you're interested in watching it before reading the rest of this post on how I created it:
 Camtasia 2 by TechSmith
 My video editing tool of choice is Camtasia 2 by TechSmith. This is a paid desktop application that is better known for its ability to record audio and video through screencasting and edit the recorded media.
Like most video editing tools, you can import external media like photo and video to include in your final product. This is how I brought together so many apps to create the final draft of this video.
Below, I will break the process down into stages and discuss how each portion was completed and how you can replicate this in your own work with video creation.
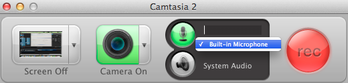
Step 1: Recording Yourself
Camtasia 2 includes this as a recording feature within their app. The settings seen here are the ones that I used for this video. I would recommend using a more high-quality external mic if you have one, as I have difficulty distinguishing the volumes that I speak on each take. (I didn't use a better mic in this video and wish I had, but didn't have one at the time.)
Camtasia 2 includes this as a recording feature within their app. The settings seen here are the ones that I used for this video. I would recommend using a more high-quality external mic if you have one, as I have difficulty distinguishing the volumes that I speak on each take. (I didn't use a better mic in this video and wish I had, but didn't have one at the time.)
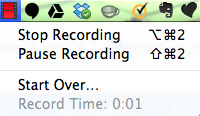
Camtasia will automatically add the media file to your video project when you stop the recording on your task bar at the top of your computer (PC will look different than Mac). You can also select the option to start over if you need to retake the shot. This action will delete the original media file and restart the recording. If you feel that a portion of the take is usable (don't forget that you can cut anything!!), then select "Stop Recording" so that media file saves.

Customizable overlays in Camtasia are available through the Annotations menu within the app. You can select and customize a range of options and coordinate when they appear on your video tracks when building your tracks atop one another. You can also resize them, select where they appear on the media, and/or include external media as annotations such as photo and video.
Just a note that if you're getting someone to shoot your video for you on a device, do not let them commit the crime of Vertical Video Syndrome. You'll thank me later:
Just a note that if you're getting someone to shoot your video for you on a device, do not let them commit the crime of Vertical Video Syndrome. You'll thank me later:
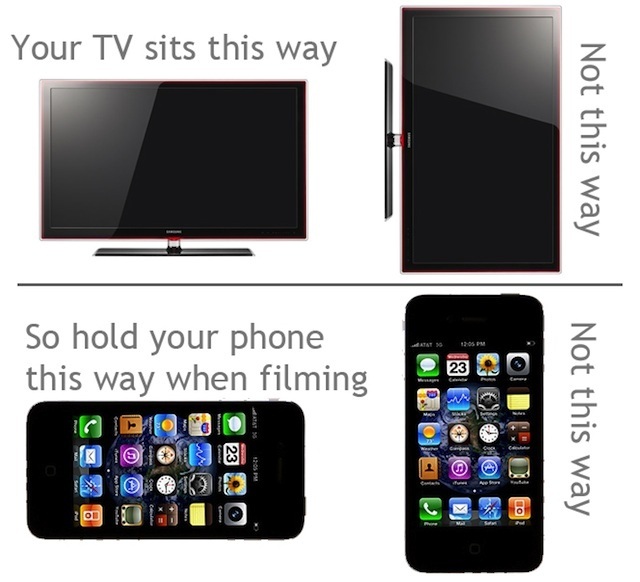
Photo by Buster Heine, Cult of Mac
Step 2: Incorporating and Cutting VideoScribe
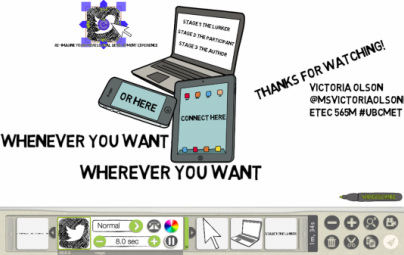
VideoScribe is that impressive and aesthetically-pleasing iOS application that shows a person's hand "scribing" and drawing your video's story. My final Twitter video features many cuts from a single VideoScribe file that I created. This section will outline the basics of VideoScribe and how I made choices on cuts, sequencing, and storyboarding for my final product.
The VideoScribe app houses several free stock images and options that range across a variety of topics. You can also purchase additional images in-app or add customizable images/text. I chose the ones that were directly related to my topic and increased or decreased the "drawing time" depending on where I needed the clip and what I needed it for. For example, the Twitter image at the beginning of the video is prescribed to be about 30 seconds, but you can tailor that to be shorter or longer. If you are unsure of how much time you need the clip to be, you can also speed up the clip in Camtasia (or whatever video editing tool you're using) after the media is imported.
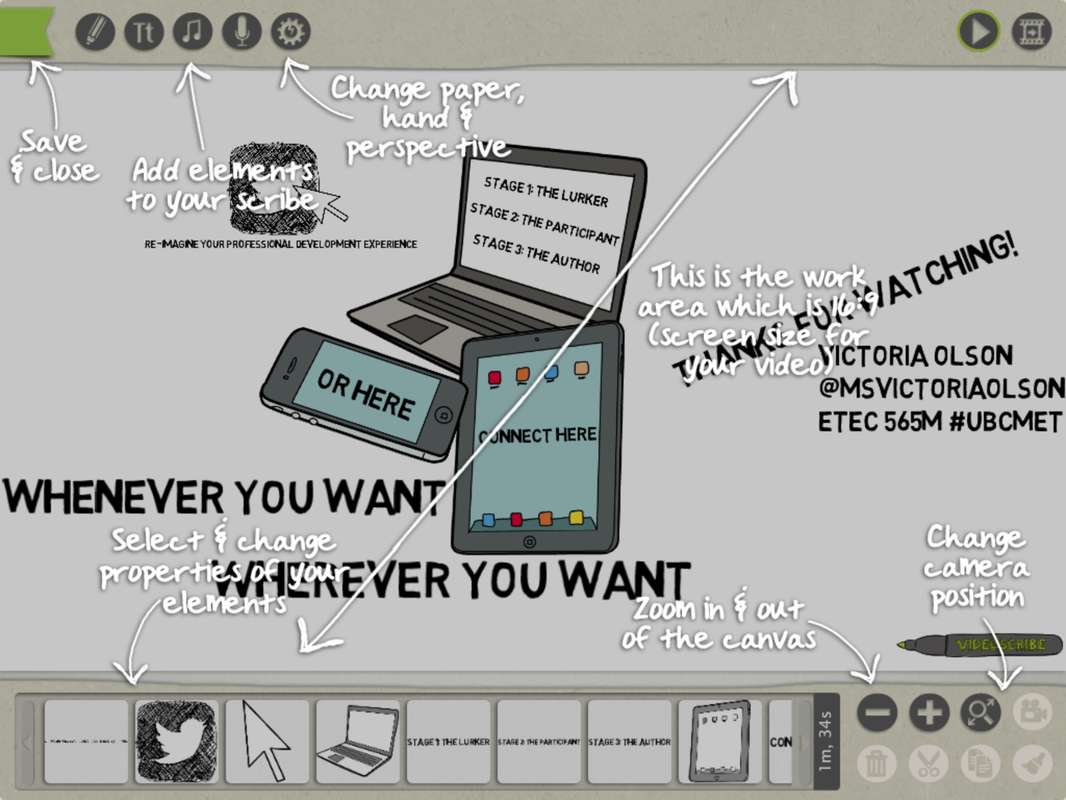
VideoScribe's quick-tips screen
So when an element is selected at the bottom of the timeline, you can customize and preview the time it plays as well as the animation. I think that the time is the most important aspect to adjust here, as I've mentioned. Some of the clips are ridiculously long and can add quite a bit of time to your video if you don't cut them. You want to have a general idea of the time and how it will fit into your final product before you export your VideoScribe file.
After completing my VideoScribe timeline, I exported the final product to the Camera Roll. I then uploaded it into Google Drive so that I could access it from my Macbook. You could use any other cloud client or you could just connect the old-fashioned way to upload the video into iPhoto. Either way, easy and quick sharing of your VideoScribe file directly to your desktop, and voila! You can then cut up that file to your heart's desire.
After completing my VideoScribe timeline, I exported the final product to the Camera Roll. I then uploaded it into Google Drive so that I could access it from my Macbook. You could use any other cloud client or you could just connect the old-fashioned way to upload the video into iPhoto. Either way, easy and quick sharing of your VideoScribe file directly to your desktop, and voila! You can then cut up that file to your heart's desire.
Step 3: Other Apps: Keynote, QuickTime, Reflector
There are two portions of the Twitter video where I utilize image layering and animation effects. Since I was on a mission to learn the most I could about this, I used two different programs for each part. One, I built in Camtasia by adjusting images and layering them over top of one another across multiple tracks. The other I built in Keynote, which was more simple by far. After I created the builds and animations for each image, I played the Keynote in full screen and recorded using QuickTime (you could use Camtasia for this also).
The other app I get asked about often is the Reflector App. This app allows you to Airplay your iPad screen to the screen of your computer. You can then capture the recording through the Reflector App itself, QuickTime, or Camtasia. This is a great app to use when you want to demonstrate something on the screen of your iPad through video.
The other app I get asked about often is the Reflector App. This app allows you to Airplay your iPad screen to the screen of your computer. You can then capture the recording through the Reflector App itself, QuickTime, or Camtasia. This is a great app to use when you want to demonstrate something on the screen of your iPad through video.
Step 4: Cutting it Up, Layering Tracks, Editing Audio
If I haven't mentioned it already, I have mad respect for professional video editors and creators after doing this project. The crazy part is that I haven't even scratched the surface of what is possible with this amazing technology, but I have already learned so much more compared to where I started. This section will outline some simple tricks when beginning your video editing process.
Cut It UP!
I'm a hack... and I don't mean computer hack; I mean that I like to chop things up . I record huge clips and cut out everything except for the tiny pieces that emphasize my message. Remember, MORE video footage is better than less - always record for longer than you think you have to because you can just cut it if you need to.
Sound Quality Matters!
If I had to pick one part of my video that I disliked, it would be the sound quality. As I mentioned before, I recorded most of my audio through my MacBook's microphone. This can be pretty inconsistent depending on the room and proximity of the mic from the audio source. I recommend using a high-quality mic and/or that one attached to a standard set of Apple earbuds works just fine, too.
Camtasia allows you to split audio and video tracks so that you can adjust the volume, clip speed, etc. as you work. This can help to make your video shorter, regulate the volume from clip to clip, or to just plain cut out things that you don't want to include.
Layering Tracks & Annotations - Experiment!
Don't be scared to play with layering image, audio, and/or video tracks over one another to see what they look like and how they can work together. Split audio from video so that you can manipulate each separately. Press the buttons. Drag things over top of one another. Experiment. That's the best way to learn!

Audio and visual tracks in Camtasia from one of my grad projects
I hope this post has helped some of you folks who were asking about my video! Video creation is one of the areas that I continue to explore both for myself and with my students. Let me know if you have any other specific questions or if you have anything to add to this post below.


 RSS Feed
