• Blog
  • About
  • Digital Portfolio
  • Presentations
    • Ontario Summit 2019
    • Petaluma iOS Summit >
      • You Can Explain Everything and Your Students Can, Too!
      • Getting Going with Google Classroom
      • Capturing Student Ideas with Visual Apps
    • ISTE15 >
      • Connecting the Next Digital Leaders
      • Hacking the Daily 5
      • Passion-Based Learning: Genius Hour, 20% Time, and Innovation Day
    • DENapalooza Vancouver 2015
    • PITA15 Whistler >
      • Passion-Based Learning: Genius Hour & 20% Time
      • Screencasting for Visible Thinking & Learning
    • CUE15 >
      • Hacking the Daily 5 - Rockstar Jam Session
      • Digital Citizenship for the 21st-Century Citizen
    • Odyssey15
    • iOS Summit Vancouver 2015
    • 2014 Presentations >
      • ERAC IL4K12
      • CUEBC14 >
        • Learn How To Drive: Storage & Collaboration in the Cloud
        • SAMR: A Technology Integration Model for Educators
      • SFU14
      • Union SD Tech Innovation Summit
      • CUE Rockstar Manhattan Beach 2014 >
        • Learn How To Drive
        • Screencasting for Visible Thinking and Learning
        • Hacking the Daily 5
      • CA GAFESummit 2014 >
        • Learn How To Drive
        • SAMR: A Technology Integration Model for Educators
        • Passion-Based Learning
      • JET14
      • MERITCon14
      • ISTE 2014
      • CanFlip14 >
        • Screencasting for Visible Thinking & Learning
        • Passion-Based Learning
      • Vancouver GAFESummit 2014 >
        • Learn How to Drive
        • Passion-Based Learning
      • Walnut Grove - Genius Hour in Elementary
      • Odyssey 2014 >
        • SAMR: A Technology Integration Model for Educators
        • Explain Everything! Practical Uses and How-Tos for Screencasting on Your iPad
        • So You Want to Mystery Skype?
      • Roseville GAFESummit - Passion-Based Learning
  • Contact
A Tech Teacher on a Mission

Automating Edcamp with Google Add-ons, Part 3: Autocrat

5/25/2015

13 Comments

 
Picture


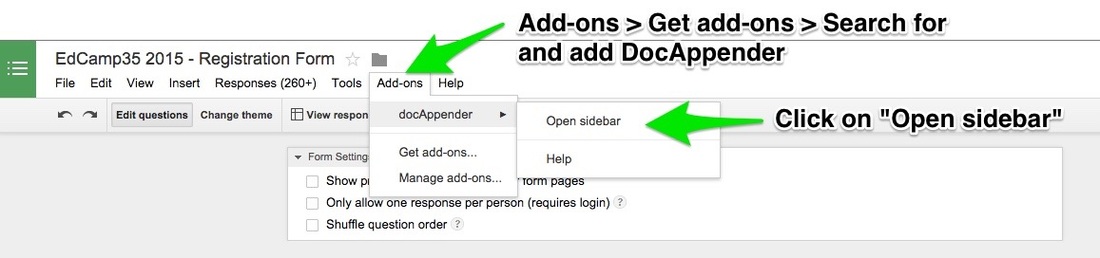
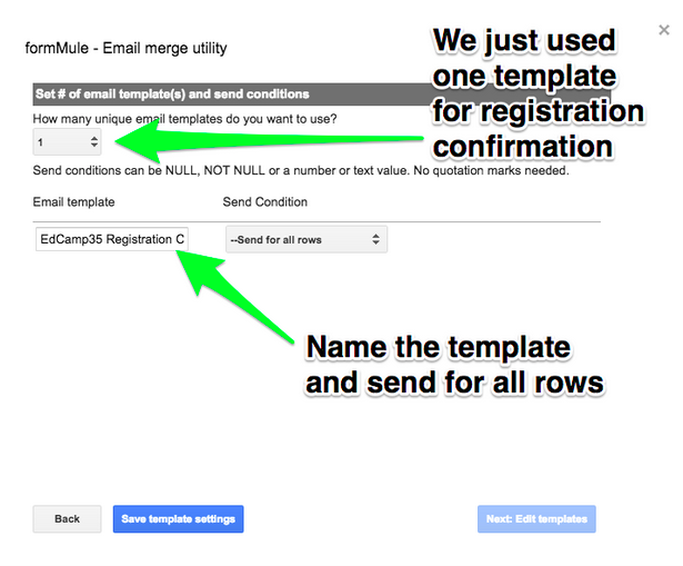
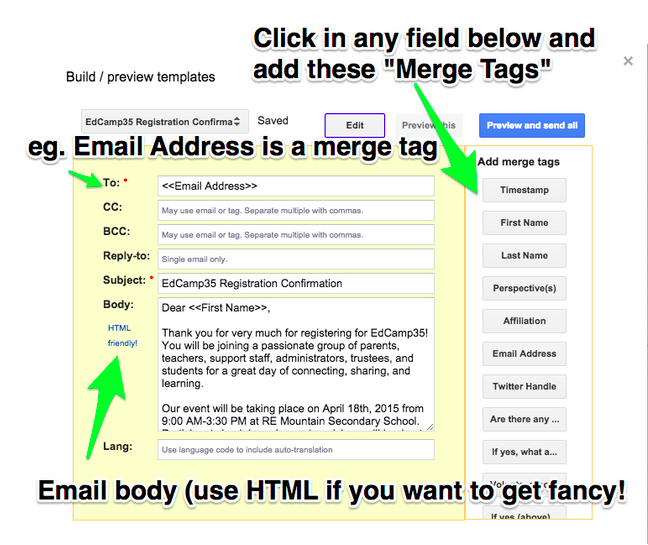
This is the final part to a three part post (and the coolest of them all, IMHO) detailing how we used Google Add-ons to make organizing easier for Edcamp35. The first post outlined how to use FormMule for confirmation emails and email updates and the second post gave an overview for using DocAppender to filter specific information from those who were willing to facilitate a session.

Add-on #3: Autocrat

Picture
Basic Add-On Description: Autocrat takes the data from a Google Sheet and renders it into an easier-to-read Google Doc or .pdf format. Additionally, you have the ability to customize the file name, type, destination folder in Drive, and you can even customize a mail merge with the documents attached! Again, this add-on for Sheets is written by the still-ever-amazing-and-awesome Andrew Stillman. (Fangirl, much? Yes. Just, yes.)


Add-on’s Function for EdCamp35: This particular workflow is my favourite use of edcamp add-on awesomeness, mainly because it allows for collaboration of your edcamp attendees. The purpose of this add-on is to automatically create collaborative session documents as the session board schedule is being finalized. Each document would be automatically created and filtered into a publicly shared folder (all documents inside would automatically inherit the folder’s sharing permissions). This way, all attendees can use the folder link to locate their session and the corresponding collaborative Google Doc to take notes on. Even better, you have a window into sessions that you were unable to attend, and to share with others later on, too!

Basic How-To:

Step 1: Create a template for what you would like your session documents would look like. This year’s version looked the one below (and you can snag your own copy on Drive if you click on the image):
Picture
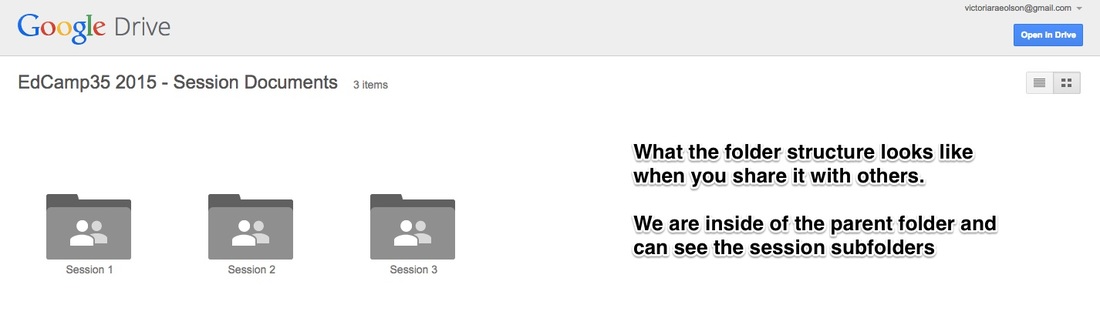
Step 2: Create a publicly editable folder in Drive where you’d like to keep the collaborative edcamp Docs. You can also create sub-folders inside of it for each session time slot that would run within your edcamp. If you make a folder for each session, it makes for easier for attendees to find the session title that they may be looking for.
Picture
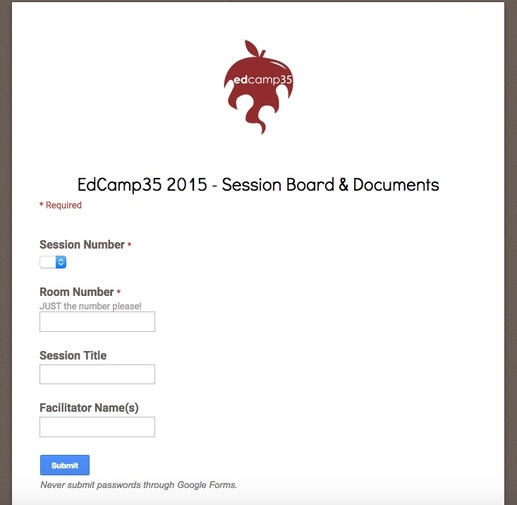
Step 3: In a different folder (for us, it was our Edcamp35 organizing folder) create a new Google Form with questions just like the ones pictured below. Add any other fields you think you might need… remember to collect everything you'll require to fill in your template doc’s fields. Here is a link to our form or take a look by clicking below.

Picture
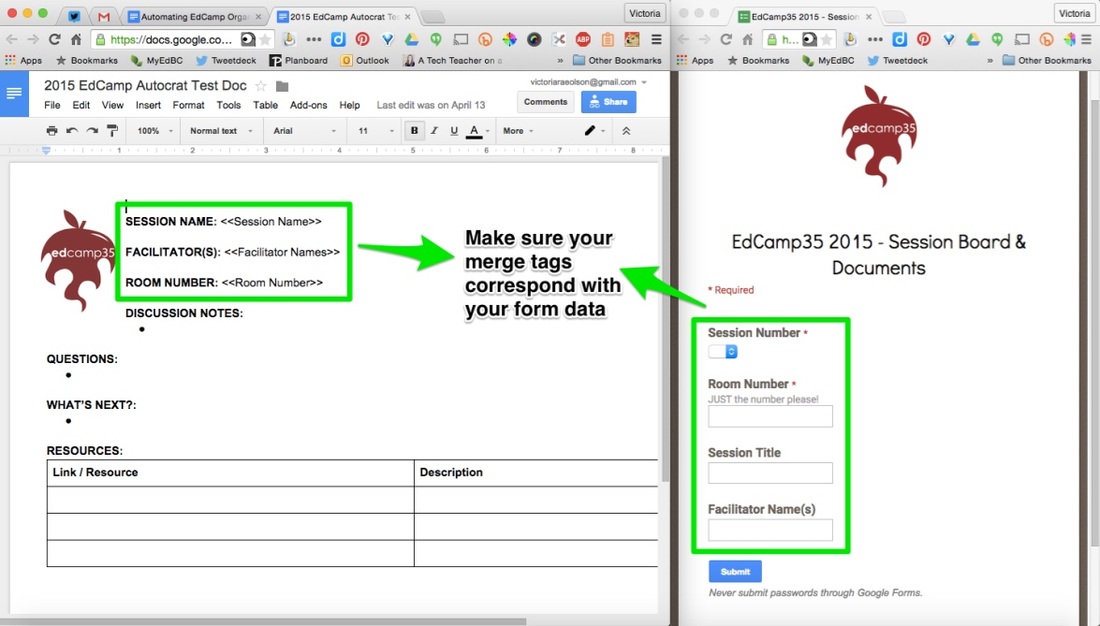
Step 4: Backing up now.... on our template document, you may have noticed these strange tags: <<Room Number>>, <<Session Name>>, etc. These are called merge tags. Wherever you add them in your template, Autocrat allow you to merge specific responses from the form into each doc that is created. For example, if I input “Genius Hour” into the form under Session Title, then I have made it so “Genius Hour” will now replace <<Session Name>> on the template document.

Now, it’s your turn! Go back to your template document and add merge tags that will correspond the data you input from your form. It’s nice to have the form and the template doc side by side (pictured below) to make it easier to correspond with one another before launching the add-on.
Picture
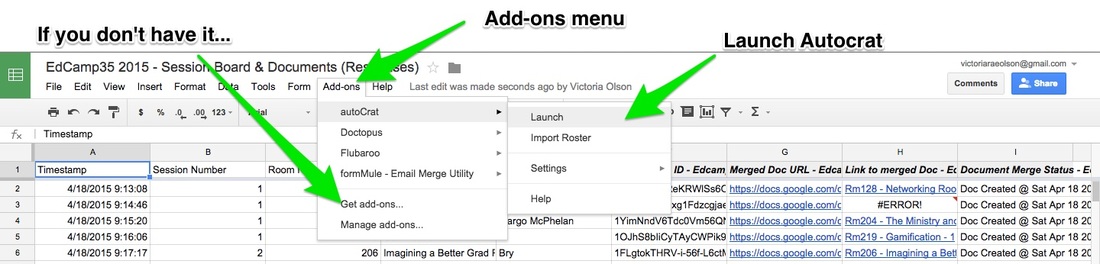
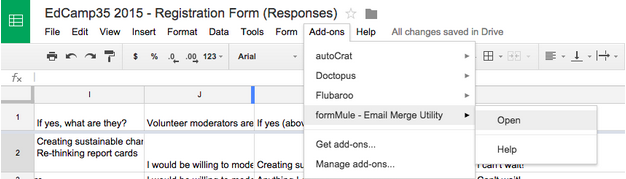
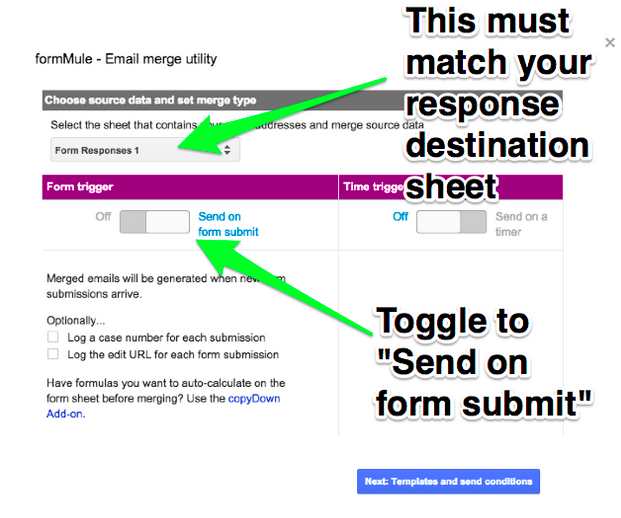
Step 5: On the Sheet that receives the form responses, I installed Autocrat in the “Add-ons” menu. Click on the “Launch” button in the menu and a sidebar will pop up for you to begin the use of the add-on. When the sidebar pops up, click "New Merge Job".
Picture

Picture
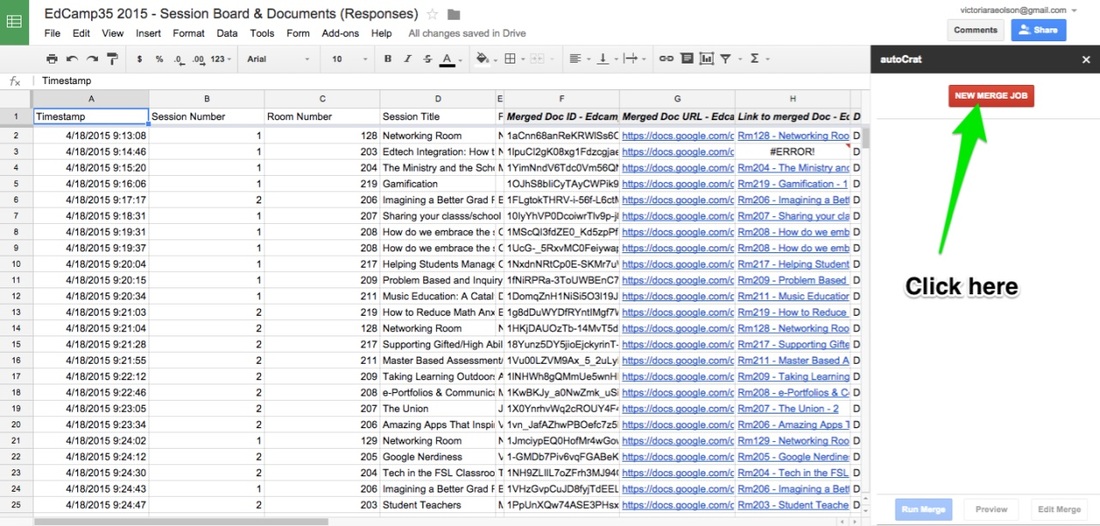
Note: This is the sheet that accepted our responses for the Edcamp35 2015. Your sheet should be empty - no data!
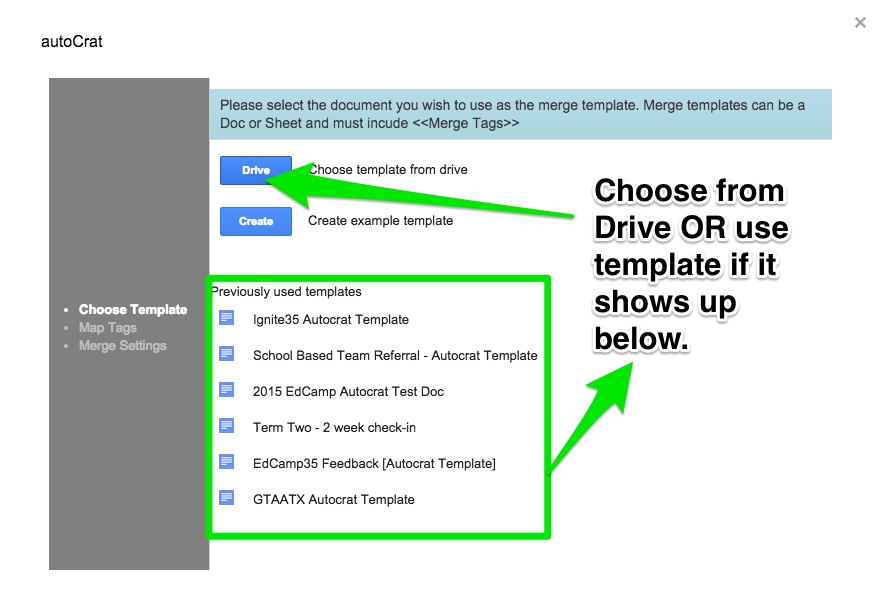
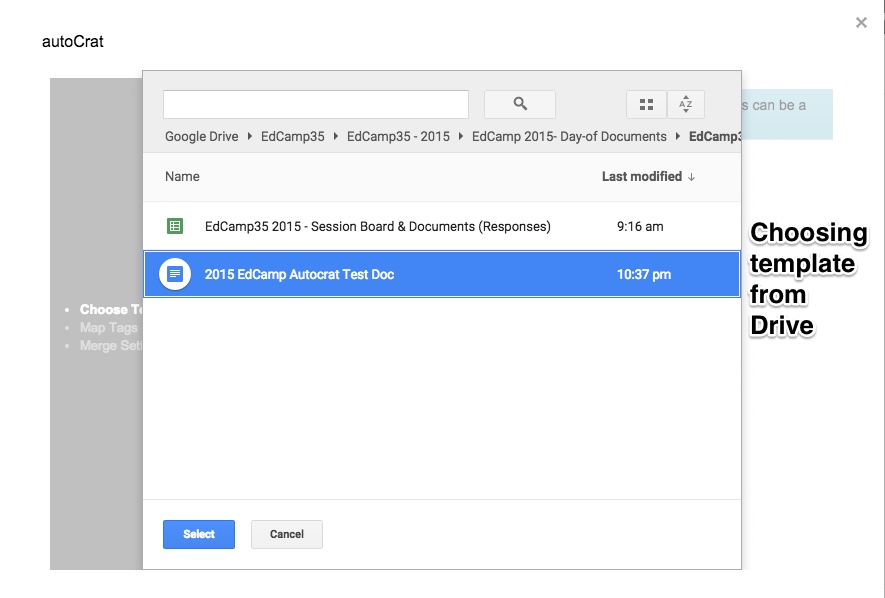
Step 6: A pop-up window will appear in your Sheet to set up the Autocrat add-on. Start by adding your template doc from Drive or by choosing a template in the document list below.
Picture

Picture
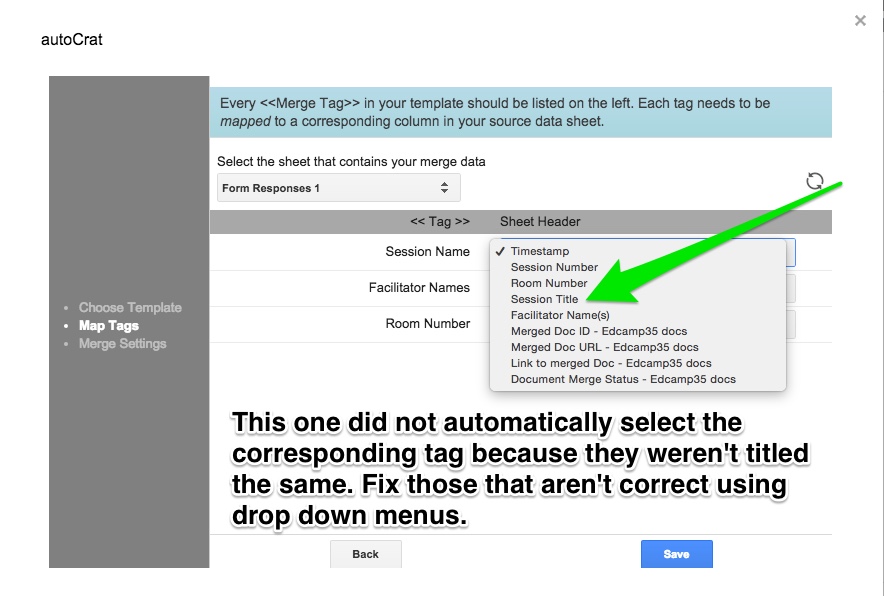
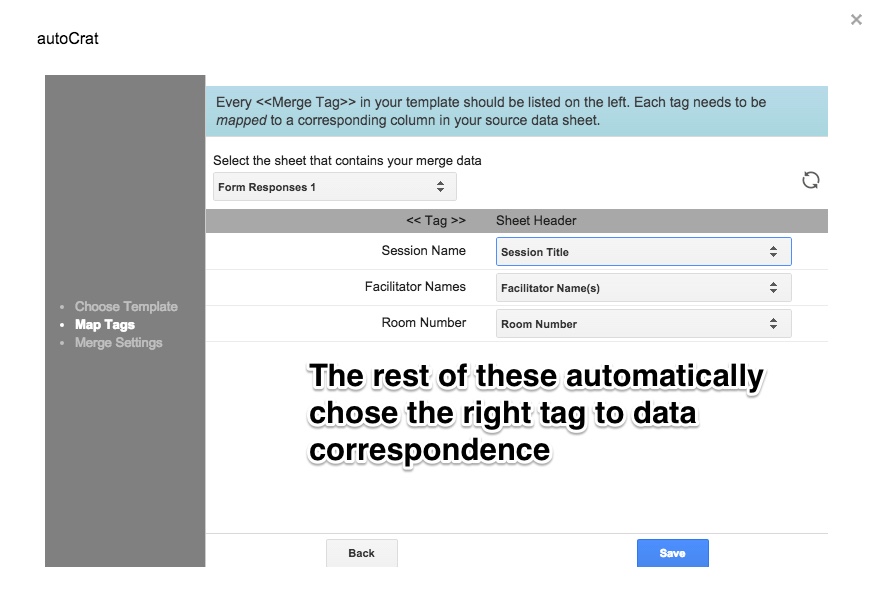
Step 7: Ensure that your merge tags correspond with the appropriate fields from your document. Some of your merge tags will automatically choose the corresponding entry from the form if they have the exact same name. Others, you will have to select from a drop-down menu.
Picture
Picture
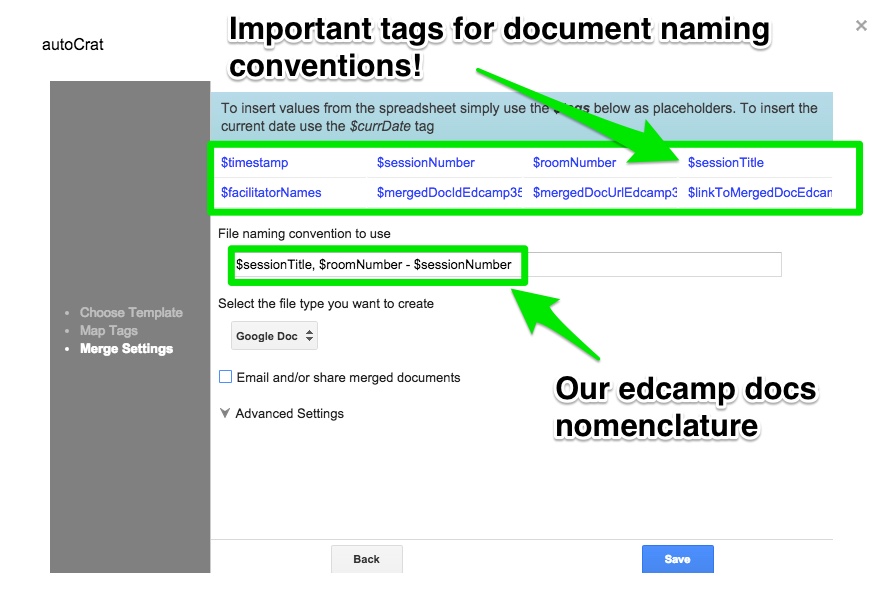
Step 8: The merge settings step has a lot of little sub-steps. First, what will your merged documents be named? You can customize this using the naming tags listed on the next step of the add-on. All documents were titled a very specific way so that they would be easy to for attendees to see and for organizers to sort (see image below). Our nomenclature for merged docs was $sessionTitle - $Rm - $sessionNumber. So, for example, a session document would come out titled as the following:

Genius Hour for Beginners - Rm208 - 3

And it would also have matching information inside of the doc where the <<merge tags>> sit.

Why did we do this? The name of the sessions is the most important aspect for attendees, so that came first. The room number is secondary. The session number was for the organizers so that we put each document in the correct collaborative docs subfolder. Remember, we had Edcamp35 Session Docs named as a parent folder and subfolders for session 1, 2, or 3. The session number in the name makes it so we don’t have to open the documents one by one to see where they should live, or continually reference the session board to figure it out.
Picture
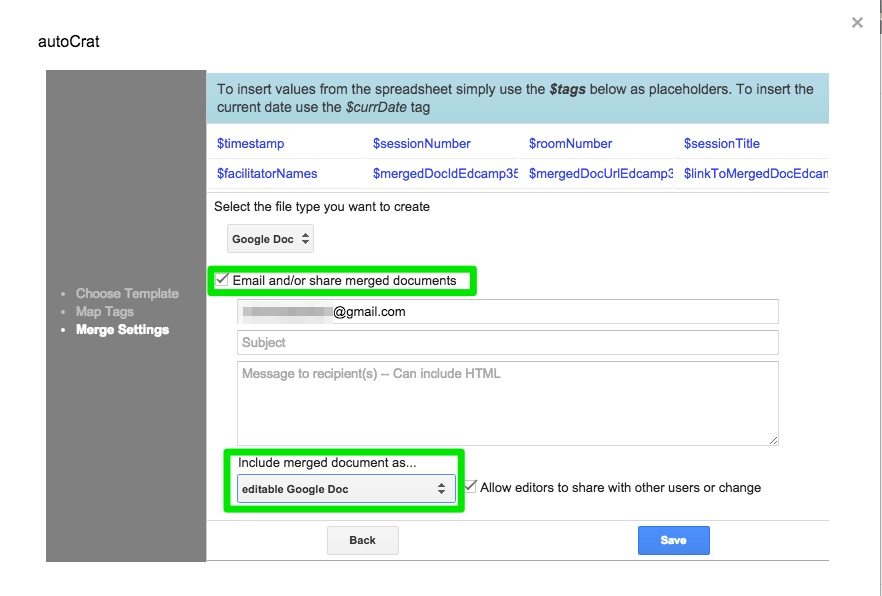
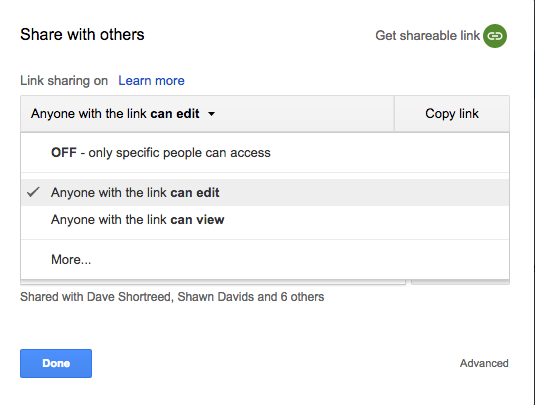
Step 9: Next, select “Email and/or share merged documents” and input your own email address (you need one; I just delete these notifications in my email later). I also ensure that it's shared as a publicly editable Google Doc, but… Google Nerd Note Reminder (as if all of this wasn’t enough already): If the destination folder is publicly editable, so will all the Docs be that are created within it. Secondary note: if you’re using Autocrat for a different purpose, you can also customize the email subject, address, and message, too!
Picture
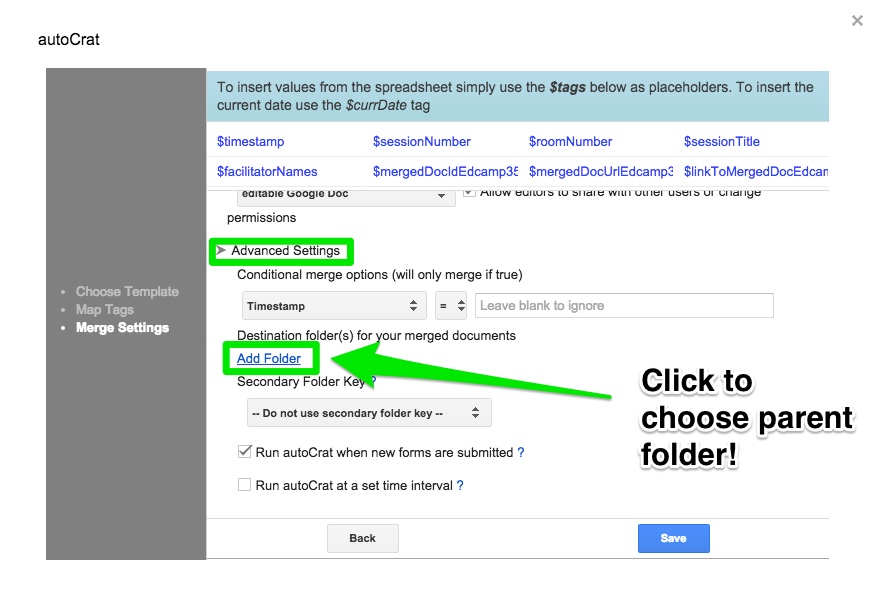
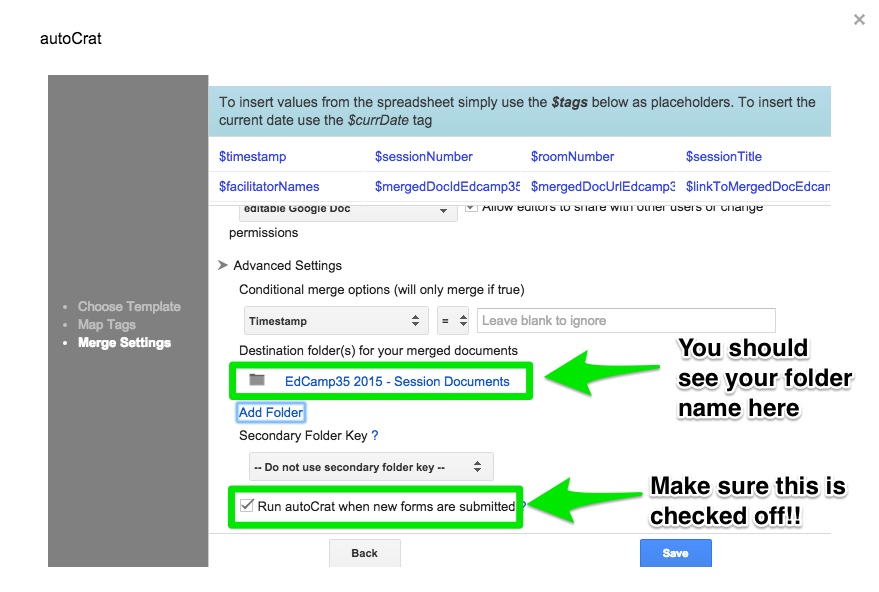
Step 10: Click to expand the Advanced Options menu. This is where you can ensure that the Docs being created would land in your appropriate parent folder. Make sure that “Run autoCrat when new forms are submitted” is checked off before pressing “Save".
Picture

Picture
Step 11: Test out the magic by filling out your form. Check the merge folder you chose to see if the document merged. You should also see the evidence of a merge on the response spreadsheet - clickable links and a merge confirmation field.
Step 12: Delete any test documents you created and double check that your parent folder is shared to be publicly editable. Share the folder link on the morning of edcamp or before so that people can access it. For Edcamp35, we created shortened URLs for this as well as QR codes for participants to scan around the building to get connected with our collaborative documents.
Picture
Step 13: We repeatedly filled out the form with session titles and rooms on the day of the edcamp in a frenzy as the session board was being built. After the documents were merged into the parent folder, we had to drag and drop each session into its corresponding session subfolder. Note that this is best done in “List View” in Drive, not "Grid View”.
Picture
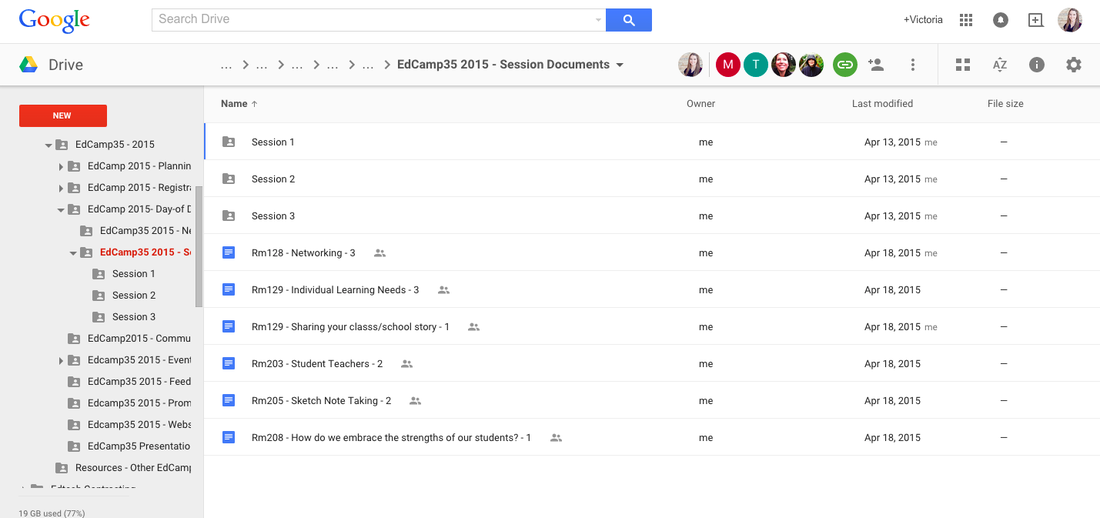
Each of these documents would get dragged and dropped into the appropriate session folder.
If you’re curious what the final structure might look like, check out our final merged products from Edcamp35 here. Some documents got edited by attendees during the conversations, others didn’t. But what we created was a shareable source of evidence of professional conversations that others could learn from. The coolest part? I learned from sessions I didn’t even attend, and so did many others! And it didn't really take that long to set up, either.

I really hope you enjoyed learning about Google Add-ons for Automating Edcamp from this series of blog posts. Thank you for planning amazing educational events (or being curious about it!) and being a part of growing professional practice through sharing and collaboration!
Picture
13 Comments

Automating EdCamp with Google Add-ons, Part 2: DocAppender

5/15/2015

1 Comment

 
This is the second part to a three-part post detailing how we used Google Add-ons to make organizing easier for Edcamp35. To see the last post on using FormMule for confirmation emails and email updates, please click here.

Add-on #2: DocAppender

Picture
Picture
*Note: Designing your form well is really important when using the FormMule and DocAppender add-ons. While DocAppender is less likely to be used in the case of edcamp, it can be helpful!*

Basic Add-On Description:
DocAppender takes the data from multiple choice questions and populates corresponding information you specify into a Google Doc of your choosing.   This add-on for Google Forms is also written by the ever-amazing Andrew Stillman (like all the ones I use!).

An example question in a Google Form might be: Do you want cake? Answer options would include “Yes” or “No”. Google Docs named “Yes” and “No” would be used to store information as it was collected. You could choose to include all the names of people who wanted cake as well as the cake flavours they’d like, giving you a nice slick list after all of the forms are filled out. The document literally gets appended every time someone completes the form, thus the name “DocAppender”.

Add-on’s Function for EdCamp35: To collect data on who would be willing to facilitate sessions and what kinds of sessions they would be willing to facilitate. In edcamps past, we have lacked facilitators in several of our rooms, and new edcampers didn’t know where to start. With our DocAppender list of facilitators, we were able to identify which sessions didn’t have facilitators and we tapped those folks on the shoulder to step up and get those conversations started. This also could be used to track food allergies or requirements if you’re providing lunch, but we used food trucks instead.

Basic How-To:

Step 1: Find and install the DocAppender Add-on in your Google Form.
Picture
Step 2: Create your edcamp registration process through a Google Form - you’ll have to coincide this step with the original set-up of the Google Form from my first post.

To do this, we created a mandatory question asking, “Would you like to facilitate a session?”. Upon signing up, participants had to choose either
  • “Yes, I would be willing to moderate a session.” OR
  • “No, I’d rather not.”
Picture
Step 3: Create or choose a Google Drive folder that will hold your documents to be appended. After you select your folder, click the "Next" button on your DocAppender sidebar.
Picture
Step 4: Indicate which multiple choice question you would like to create documents for. Google Docs will be automatically populated for you within the folder you chose when you click the “Save” button. These Docs will be named exactly as the responses to the question you’d like to collect data on. Our answers were: “Yes, I would be willing to moderate a session.” or “No, I’d rather not.”, so our Google Docs were called the same thing. Click "Next" when you're done.
Picture
Step 5: Choose all of the data on your form you’d like appended to each document and how you would like it to appear. Every time a response is submitted, that information would get populated into each document. We only really needed data from one of the responses, but you have to collect both anyways. Click "Save Changes" to complete the set-up.
Picture
Step 6: Fill out your form to do a test run of whether or not it worked (remember which response you select!). Check by opening the Google Doc with the response you entered. It should have appended the data you indicated in the set-up!
Picture
Picture
For our use with Edcamp35, when a response was submitted, anyone who said “Yes” to facilitating a session would automatically have their name, email addresses, and suggested topics saved in a table on the “Yes” doc. Our organizing team could then contact specific attendees regarding anticipated sessions that might be harder to find facilitators for. 

After testing and tinkering to make sure it works, your form link should now be fully ready to send out to attendees! If you are looking for more geeky Google tricks for edcamp organizing, stay tuned on my blog for Part Three which will feature the use of the Autocrat Add-on for EdCamp35! 
Picture
1 Comment

Automating EdCamp with Google Add-Ons, Part 1: FormMule

4/29/2015

8 Comments

 
Picture
Earlier this month, our organizing team put on the 2nd annual EdCamp35 event held at R.E. Mountain Secondary in Langley, BC. The event seemed to be a success, from the wonderful feedback from participants as well as the excited buzz that continued into the following weeks.

While many people pitch in to make edcamp possible, it should be known that there are a number of technology tools that make our jobs easier, too! I used 3 Google Add-Ons to automate our edcamp planning this year. 


This blog post will be the first of a three-part series that will outline how to use Google Add-Ons for edcamp organization ease! I will be covering our use of FormMule, DocAppender, and Autocrat for EdCamp35. 

Add-on #1: FormMule

Picture
*Note: The first two add-ons that I will cover rely on one another, but FormMule is more likely to be used than DocAppender so I’m covering it first.*

Basic Add-On Description: FormMule is an add-on for Google Sheets written by the amazing Andrew Stillman. It is used to send specific mail merges through the creation of customized message templates. FormMule allows the inclusion of merge tags - if a participant inputs their first name into the form, their first name will automatically appear where the <<First Name>> tag is located within the email template. Finally, it can be set up so that as soon as new data is added to a Google Form, the destination Sheet will automatically send the email to the person who filled out the form.


Add-on’s Function for EdCamp35: To send automatic registration confirmation emails to attendees as soon as they register. This kept us from having to deal with writing dozens of emails saying - “Yes, you’re registered, don’t worry!” It also gave participants the preliminary information they needed regarding details for the day of edcamp.

Basic How-To:

Step 1: Create your edcamp registration process through a Google Form

You can take a look at EdCamp35’s copy here and use it as a springboard for creating your own. Make sure you are collecting all of the information you’ll need from attendees, particularly full names and an email address. As soon as your Form is created, a Sheet will be automatically created and will be the destination for your registrants’ data.

Fill out your own form right away to test it out. This is an extremely an important step for later. If you want to fill it out more than once with your own information, or have your co-organizers do the same, that’s fine.


Step 2: Write the template email that you would like attendees to receive

Provide your registered edcampers with some peace of mind that they have, indeed, successfully registered for your event. You don’t have to get fancy with this; including only necessary information in this initial email is okay. Please note that if you want to get fancy and include hyperlinks and images, they will have to be written in HTML in FormMule. Here is a copy of our registration confirmation template if you want to use it as a model for your own.


Step 3: Set up the FormMule add-on

The set-up for FormMule is pretty easy and has a few steps of its own. Ensure that you set this up on the destination spreadsheet for your registration form.

First, go to Add-ons. If you don’t see the FormMule, add-on, click “Get add-ons” and search for it. Once you’ve installed it, click on FormMule, then Open.
Picture
A window to run the FormMule add-on will pop up and you will have to go through the steps to set it up, but it’s pretty straight forward. All of the steps as we used them are outlined in the following images.

Window 1:
Picture
Click "Next: Templates and send conditions" which will take you to Window 2:
Picture
After this step, click “save template settings”, then “Next: Edit templates”. Window 3 should appear, where you can edit your email template:
Picture
Finally, click on “Preview and send all” to take a look at your handiwork. If you’re happy with the preview you see, press "send all". If there is something missing or doesn’t look right, use the back button to review the steps to fix it.

Once you press “send”, you and any other organizers that filled out the form earlier should receive an email confirming your registration for edcamp within a few minutes. If you don’t receive an email, troubleshoot for the following:

  • be sure to check that the “trigger on form submit” toggle is on (first step of FormMule set-up)
  • that there isn’t a typo in the emails that were submitted to the form
  • that the <<Email Address>> merge tag is in the “To” space of the email template

Finally, you’ll want to test out your live form with another email address. Return to your registration form and fill it out one more time (with a different email if you want to REALLY make sure). If you’ve received the registration confirmation to that address, I’d say you found success with Google Add-ons for Edcamp… Part one. 


Now you could send your form link out to attendees, but maybe you are looking for more geeky Google tricks for edcamp organizing? Stay tuned on my blog for Part Two which will feature the use of the DocAppender Add-on for EdCamp35.
Picture
8 Comments

What Am I Doing To Make the World a Better Place?

1/14/2015

4 Comments

 
PictureI'm not there yet, Dr. King, but I'm trying! (Image credit: Emmanual Gonot on Flickr)
**Distractor/Disclaimer: I posted two blog posts in one week! The world may or may not be over as we know it.**

I often get made fun of for never writing blog posts. Now the antagonists will turn their forces - ahem, #EduPressure - elsewhere. At least for now.

**Resume serious post**

This week’s #YourEduStory poses a challenging question. This question is one where I feel that my answer should be incredibly groundbreaking, honourable, or innovative. When someone says “make the world a better place”, don’t you immediately envision some of world’s greatest and most iconic human beings and/or their associated movements?

I sure do. And that’s a lot to measure oneself up to, especially a I’m-only-in-my-fourth-year-of-teaching-and-just-coming-into-myself kinda girl. That’s me. I’m not groundbreaking, honourable, or innovative by those high standards.

So I decided to give myself a break. I don’t have to be those things. I do have to be me. I do have to work with what I’ve got.

What I’ve got right now to offer the world are just little things. Karl says to me all the time, “It’s the little things,” and I am led to believe that those little things can make an impact on little worlds - worlds of kids and worlds of teachers. In turn, my hope is that those little things can have an impact on the big world.

PictureImage credit: guercio on Flickr
Here the little things I offer that might make an impact: 

For the kids:

I have the ability to make small strides in how I support my students. I make a difference by continually encouraging them even when they’re not doing so well. I have opportunities to turn their attitudes around toward an academic concept at school, or to get them to open their views to the world in new and exciting ways. 

For teachers: 

I’ve been working on teaching little tech-tricks to teachers make them more excited about technology. Even when it’s completely about us as educators, we go crazy for new tricks that make us look tech-savvy. And that’s the thing I’m making teachers realize: playing with technology and finding ways to utilize it makes us proud to use it. That, in turn, may motivate us to use it more, to experiment more, and hopefully in new and different ways with students. 

For me:

I’m trying to take better care of myself in 2015. I’ve said NO to so, so, so many opportunities because I need to let myself have more time. I want to dedicate time to my friends and social engagements. I want to watch TV sometimes. Oh, and sleep… that, too. 

So there you have it: I’m not making the entire world a better place by creating massive human movement. But I’m making the worlds of some big people and some little people better by doing what I love and trying to do it well. And I’m glad that I’m taking time to extend that gift to myself, too.

Picture
4 Comments

Using My FitBit for Reminders While Teaching

10/28/2014

5 Comments

 
PictureImage retrieved from Wikipedia.org
In May of this year, I purchased a FitBit Flex - a device to wear around my wrist that would help me to track my daily steps taken, nightly rest cycles, and to give me daily silent reminders through a vibrating alarm. Some teachers use the FitBit or other health trackers to ensure that they are up and moving all day. While my FitBit has certainly reminded me to get up and get moving more, I have found another use for it while teaching.

So, confession time: I am a very forgetful person when it comes to timing, scheduling, and keeping track of items like my keys. I could probably lose my keys while my car is running... it's that bad. So, if a brilliant moment of learning is going on, I completely forget that I am supposed to remind Student X to go take her ADHD medication or for Student Y to go to his small group lesson for Learning Support.  As I have settled into my new class for the year, I have several students who need reminders throughout the day about specific things, whether to check in with me on a behaviour issue, check in at the office for medication, or just to be sent to the Learning Support room for extra assistance with academic or social skills.

I have begun setting my FitBit silent alarms to go off throughout the day to remind me to do those things. That way, when I feel the device buzzing on my wrist, no one else hears it, and I can gently remind the student about what they need to go do, even if it is in the middle of something else important for the rest of the class.

I know this is a tiny tip, but it has already helped me enormously with remembering all of the "little things" that we teachers do to accommodate student needs. I hope it helps you, too!

Picture
5 Comments

How I Made My Twitter Video...

12/19/2013

6 Comments

 
After creating my video about using Twitter for professional development, I had many members of my PLN asking how I did it. The short answer is "hard work and problem solving". The long answer is me writing a blog post about it, so... here it is.

(Also, you're welcome, Dean Shareski... I've finally done my homework.)

Here is the video below, if you're interested in watching it before reading the rest of this post on how I created it: 
PictureCamtasia 2 by TechSmith
My video editing tool of choice is Camtasia 2 by TechSmith. This is a paid desktop application that is better known for its ability to record audio and video through screencasting and edit the recorded media. 

Like most video editing tools, you can import external media like photo and video to include in your final product. This is how I brought together so many apps to create the final draft of this video. 

Below, I will break the process down into stages and discuss how each portion was completed and how you can replicate this in your own work with video creation.

Picture
Step 1: Recording Yourself 

Camtasia 2 includes this as a recording feature within their app. The settings seen here are the ones that I used for this video. I would recommend using a more high-quality external mic if you have one, as I have difficulty distinguishing the volumes that I speak on each take. (I didn't use a better mic in this video and wish I had, but didn't have one at the time.)

Picture
Camtasia will automatically add the media file to your video project when you stop the recording on your task bar at the top of your computer (PC will look different than Mac). You can also select the option to start over if you need to retake the shot. This action will delete the original media file and restart the recording. If you feel that a portion of the take is usable (don't forget that you can cut anything!!), then select "Stop Recording" so that media file saves. 

Picture
Customizable overlays in Camtasia are available through the Annotations menu within the app. You can select and customize a range of options and coordinate when they appear on your video tracks when building your tracks atop one another. You can also resize them, select where they appear on the media, and/or include external media as annotations such as photo and video. 

Just a note that if you're getting someone to shoot your video for you on a device, do not let them commit the crime of Vertical Video Syndrome. You'll thank me later:

Picture
Photo by Buster Heine, Cult of Mac
Step 2: Incorporating and Cutting VideoScribe

VideoScribe is that impressive and aesthetically-pleasing  iOS application that shows a person's hand "scribing" and drawing your video's story. My final Twitter video features many cuts from a single VideoScribe file that I created. This section will outline the basics of VideoScribe and how I made choices on cuts, sequencing, and storyboarding for my final product.

The VideoScribe app houses several free stock images and options that range across a variety of topics. You can also purchase additional images in-app or add customizable images/text. I chose the ones that were directly related to my topic and increased or decreased the "drawing time" depending on where I needed the clip and what I needed it for. For example, the Twitter image at the beginning of the video is prescribed to be about 30 seconds, but you can tailor that to be shorter or longer. If you are unsure of how much time you need the clip to be,  you can also speed up the clip in Camtasia (or whatever video editing tool you're using) after the media is imported. 
Picture
VideoScribe's quick-tips screen
Picture
So when an element is selected at the bottom of the timeline, you can customize and preview the time it plays as well as the animation. I think that the time is the most important aspect to adjust here, as I've mentioned. Some of the clips are ridiculously long and can add quite a bit of time to your video if you don't cut them. You want to have a general idea of the time and how it will fit into your final product before you export your VideoScribe file.

After completing my VideoScribe timeline, I exported the final product to the Camera Roll. I then uploaded it into Google Drive so that I could access it from my Macbook. You could use any other cloud client or you could just connect the old-fashioned way to upload the video into iPhoto. Either way, easy and quick sharing of your VideoScribe file directly to your desktop, and voila! You can then cut up that file to your heart's desire.

Step 3: Other Apps: Keynote, QuickTime, Reflector
Picture
There are two portions of the Twitter video where I utilize image layering and animation effects. Since I was on a mission to learn the most I could about this, I used two different programs for each part. One, I built in Camtasia by adjusting images and layering them over top of one another across multiple tracks. The other I built in Keynote, which was more simple by far. After I created the builds and animations for each image, I played the Keynote in full screen and recorded using QuickTime (you could use Camtasia for this also).

The other app I get asked about often is the Reflector App. This app allows you to Airplay your iPad screen to the screen of your computer. You can then capture the recording through the Reflector App itself, QuickTime, or Camtasia. This is a great app to use when you want to demonstrate something on the screen of your iPad through video. 

Picture
Step 4: Cutting it Up, Layering Tracks, Editing Audio


If I haven't mentioned it already, I have mad respect for professional video editors and creators after doing this project. The crazy part is that I haven't even scratched the surface of what is possible with this amazing technology, but I have already learned so much more compared to where I started. This section will outline some simple tricks when beginning your video editing process.


Cut It UP!

I'm a hack... and I don't mean computer hack; I mean that I like to chop things up . I record huge clips and cut out everything except for the tiny pieces that emphasize my message. Remember, MORE video footage is better than less - always record for longer than you think you have to because you can just cut it if you need to.

Sound Quality Matters!

If I had to pick one part of my video that I disliked, it would be the sound quality. As I mentioned before, I recorded most of my audio through my MacBook's microphone. This can be pretty inconsistent depending on the room and proximity of the mic from the audio source. I recommend using a high-quality mic and/or that one attached to a standard set of Apple earbuds works just fine, too. 

Camtasia allows you to split audio and video tracks so that you can adjust the volume, clip speed, etc. as you work. This can help to make your video shorter, regulate the volume from clip to clip, or to just plain cut out things that you don't want to include. 

Layering Tracks & Annotations - Experiment!

Don't be scared to play with layering image, audio, and/or video tracks over one another to see what they look like and how they can work together. Split audio from video so that you can manipulate each separately. Press the buttons. Drag things over top of one another. Experiment. That's the best way to learn!
Picture
Audio and visual tracks in Camtasia from one of my grad projects
I hope this post has helped some of you folks who were asking about my video!  Video creation is one of the areas that I continue to explore both for myself and with my students. Let me know if you have any other specific questions or if you have anything to add to this post below.
Picture
6 Comments

Is Visible Thinking Enough?

12/12/2013

7 Comments

 
There are several powerful technological tools that can document visible thinking and learning for our students. Screencasting, voice recording, blogging, and video are at the forefront of the movement for student content creation and undoubtedly hold a lot of clout in helping teachers to assess for next steps in instruction.

When creating screencasts, my students' thought processes have become more complex as they speak their thinking about learning processes aloud. They take time to consider their words carefully in order to create authentic recordings of their learning. However, as my students work on these mediums, I'm not convinced that students' simple documentation of their thinking is enough. Sure, it tells something to me as the teacher, but does it reach full potentials for the student? 
Picture
This brings me to the most incredible choice I've made in my classroom so far this year: pushing for a consistent blend student self-assessment, constructive criticism toward and from their peers, and materials that inform my future teaching.

When screencasting, there is nothing more powerful than students listening to the playback of their own thinking. This process of re-reading, reflecting, and re-vamping is necessary in so many other facets of our classrooms, though. The challenge for educators lies in teaching students how to take fair and meaningful reflections and assessments of their own work. Though this is a little bit meta  (learning how to assess your own learning ), it is amazingly powerful when students learn what they need to improve about themselves and their work, and when they choose to do so independently.

Explicit instruction and one-on-one interviews are absolutely necessary in the beginning of this teaching. It helps to set your expectations for each student's self-assessments as well as finding out about theirs. The end result helps them to shape their evaluations of themselves and base this thinking on a growth mindset: "What could I do better?" and "How can I do it better?" 

After seeing the power of this in areas such as reading and math, I have begun integrating multiple student self-assessments into every subject area both with and without technology. My conclusion thus far is that student engagement is not improved simply by use of technologies, but rather, by meaningful student-centred pedagogy. From improving recorded playbacks, to monitoring self-progress through checklists, student blogging, reflection on completed tasks, and goal creation for the future, it has been nothing short of rewarding to watch my students take charge of their own learning. 

How do you your students assess their own work? How do you help students to make appropriate and fair judgments of their own work to improve for the future? Your commentary is appreciated as I continue to build on this aspect of my classroom.

Picture
7 Comments

Re-Imagine Your Professional Development Experience... With Twitter! 

10/12/2013

6 Comments

 
This is a video project that I created for my Mobile Technologies class (ETEC 565M) in the UBC Master of Educational Technology program.

My personal journey with this social media has opened up and transformed my educational world. Because of Twitter, I have enjoyed several professional experiences over the past six months like connecting with colleagues at edcamps, traveling to California to attend conference and collaborate with other educators, and establishing online communities and conversations through hashtags like #bcedchat. I am passionate about the use of this tool, among many, to help educators connect and transform their own professional learning experience.

Check out my video below to find out more!
Thanks for reading, watching, commenting, and sharing! Happy tweeting! 
Picture
6 Comments

Balancing Imbalance

10/2/2013

6 Comments

 
Oh, man.  September is over.  Queue the music.  Breathe.  ... Right?

This first month of school has brought with it many adjustments in my world.  I'm at a new school, teaching a new grade, working with a new staff on technology goals, and getting used to the workload involved with two graduate courses. Needless to say, September has been a bit of a whirlwind.  Mix those together with all of the things I was already doing and that is a recipe for an imbalanced disaster.  A month later, I'm just starting to finally feel like I'm on top of these new demands.  My absence from blogging has been due to my attempts to normalize my new realities.  Something had to go on the back burner for the month.  But now, I'm in control.... for the moment.
PictureBalance? What's that?
People often ask me, "How do you have time for all of that extra stuff?" These questions always spin me into a state of reflection.  Of course, I've asked myself the same thing.  How do I have time?  Is my life in a perpetual state of imbalance?  Am I happy even though I work practically every waking moment of the day? Is burnout inevitable? 

If you've ever been in a similar situation, you'll relate that reflecting on this is extremely difficult.  When you're so entrenched in the status quo, it's hard to see how far you can bend before you break.  While connecting to new people and ideas is important, it's also important to take a step back to understand what you're capable of and why it matters to you.  That's what fuels my passion -- the "why" I do it, not the "how".

So here's why it all matters to me:
  1. I absolutely adore my students and want to deliver the best educational experience they can possibly have.
  2. I love learning.  I love finding out new information.  Between my PLN and the MET Graduate program, I am consistently forced outside my comfort zone, and that's a good thing.
  3. Growth is essential in our profession.  If you don't set out to improve yourself, no one is going to do it for you.
  4. I am passionate about meaningful technology integration in the classroom.  It needs to be relevant for the future, not the present, and certainly not the past. 
  5. Throughout this journey, I've made incredible connections who have given me consistently overwhelming support every step of the way. I want to pay it forward and inspire others to connect.

 With those things in mind, I can confidently say that I'm very happy with my life and the time that I dedicate to my work and studies.  Should I be making more time for other things?  Sure.  I'd argue that most educators could use a little more balance.  But just as September did, this, too, shall pass.

Picture


6 Comments

Remind101: The Safe Way To Communicate With Students and Parents

9/2/2013

11 Comments

 
Picture
Remind101 is a free, safe, and efficient way to communicate with students and parents via SMS (text) messaging.  You can sign up for the service on their website or through their iOS or Android apps on your phone or device. 

Remind101 does not give your subscribers your personal phone number and does not allow for them to reply to your reminders.  Likewise, you cannot access the personal phone numbers of your subscribers. Messages cannot be edited or deleted once sent, either. 

Once you sign up and create a class, Remind101 will generate a domestic phone number and unique class code so that subscribers to your class can begin to sign up.  Any phone that receives text messages will be able to subscribe to your class reminders.

Picture
Through both the web portal and the app, you can schedule SMS messages to be sent out at specific times.  Another cool feature is that if you are composing a message at a late hour - let's be honest, teachers work often work late - you will be prompted to schedule the message to roll out at a more reasonable time.  After all, your subscribers probably don't want to receive a text message at 12:30 AM! 
Picture
The text message interface is set up exactly as a regular SMS message.  In the screenshot below, I have sent the code to subscribe to my class texts, and followed the prompts sent back to set up the subscription.  Having your parents and/or students inputting their full name is important so that you can manage your subscription lists.  You don't want to have anyone on your subscription list that isn't a part of your class.

Near the bottom of this same screenshot, you will see that every time I send out a text message via the Remind101 web portal or iPhone app, my name will appear at the front of the text.  This will remind parents and students who don't save your Remind101 number into their phones that the text is from you. 
Picture
It is my hope that these instructions can help you get set up with this awesome app.  Communicating is easy when you have Remind101! 
Picture
This post will be available for future reference under "Remind 101" on my site. 
11 Comments
<<Previous

    Author

    Victoria Olson
    A curious and passionate educator in Langley, BC

    Picture

    Picture

    Picture

    Picture

    Picture

    Picture

    Tweets by @MsVictoriaOlson

    Picture

    Picture

    RSS Feed


    Archives

    April 2020
    March 2020
    February 2016
    January 2016
    August 2015
    May 2015
    April 2015
    March 2015
    February 2015
    January 2015
    December 2014
    October 2014
    September 2014
    July 2014
    May 2014
    April 2014
    March 2014
    January 2014
    December 2013
    November 2013
    October 2013
    September 2013
    August 2013
    July 2013
    June 2013
    May 2013
    April 2013


    Categories

    All
    Assessment
    Augmented Reality
    Balance
    Blogging
    Camtasia
    Collaboration
    Communication
    Community
    Creativity
    Design
    Edcamp
    #EdFailFwd
    Education
    Efficiency
    Elementary
    Google Teacher Academy
    Guided Math
    Intermediate
    Ipads
    Multi Age
    Multi-age
    Pln
    Primary
    Pro D
    Pro D
    Pro-D
    Reflection
    Resource
    Screencasting
    Self Regulation
    Sharing
    Tech
    Things That Suck
    Think35
    Twitter
    Video
    #YourEduStory


    Want to subscribe to this blog? Enter your email address below for automatic email updates:

    Enter your email address:

    Delivered by FeedBurner

Powered by Create your own unique website with customizable templates.