
While many people pitch in to make edcamp possible, it should be known that there are a number of technology tools that make our jobs easier, too! I used 3 Google Add-Ons to automate our edcamp planning this year.
This blog post will be the first of a three-part series that will outline how to use Google Add-Ons for edcamp organization ease! I will be covering our use of FormMule, DocAppender, and Autocrat for EdCamp35.
Add-on #1: FormMule

Basic Add-On Description: FormMule is an add-on for Google Sheets written by the amazing Andrew Stillman. It is used to send specific mail merges through the creation of customized message templates. FormMule allows the inclusion of merge tags - if a participant inputs their first name into the form, their first name will automatically appear where the <<First Name>> tag is located within the email template. Finally, it can be set up so that as soon as new data is added to a Google Form, the destination Sheet will automatically send the email to the person who filled out the form.
Add-on’s Function for EdCamp35: To send automatic registration confirmation emails to attendees as soon as they register. This kept us from having to deal with writing dozens of emails saying - “Yes, you’re registered, don’t worry!” It also gave participants the preliminary information they needed regarding details for the day of edcamp.
Basic How-To:
You can take a look at EdCamp35’s copy here and use it as a springboard for creating your own. Make sure you are collecting all of the information you’ll need from attendees, particularly full names and an email address. As soon as your Form is created, a Sheet will be automatically created and will be the destination for your registrants’ data.
Fill out your own form right away to test it out. This is an extremely an important step for later. If you want to fill it out more than once with your own information, or have your co-organizers do the same, that’s fine.
Step 2: Write the template email that you would like attendees to receive
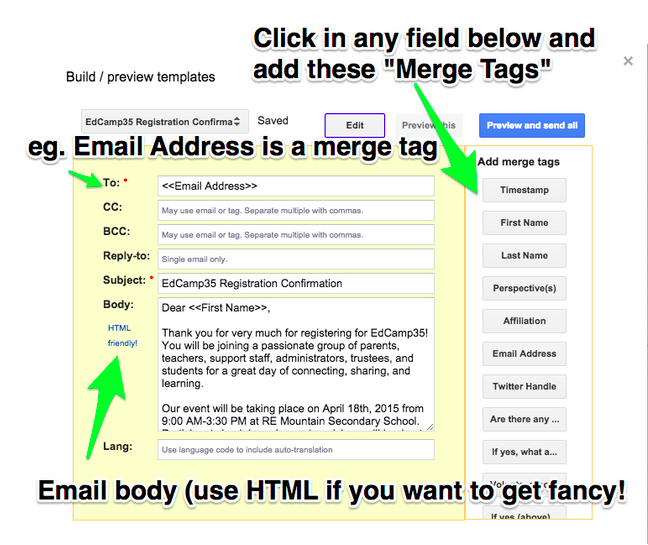
Provide your registered edcampers with some peace of mind that they have, indeed, successfully registered for your event. You don’t have to get fancy with this; including only necessary information in this initial email is okay. Please note that if you want to get fancy and include hyperlinks and images, they will have to be written in HTML in FormMule. Here is a copy of our registration confirmation template if you want to use it as a model for your own.
Step 3: Set up the FormMule add-on
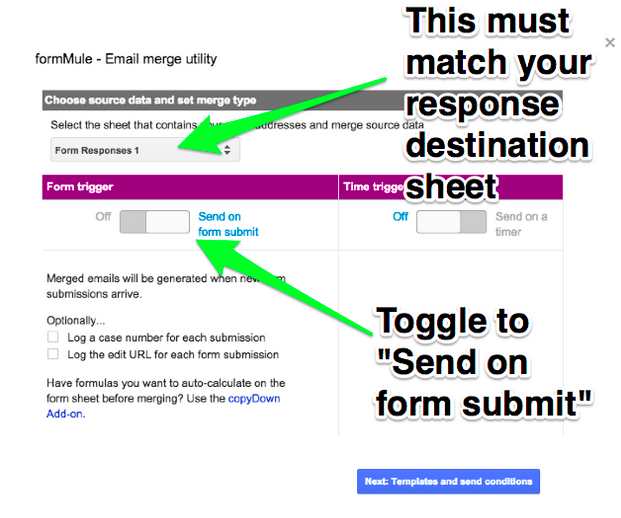
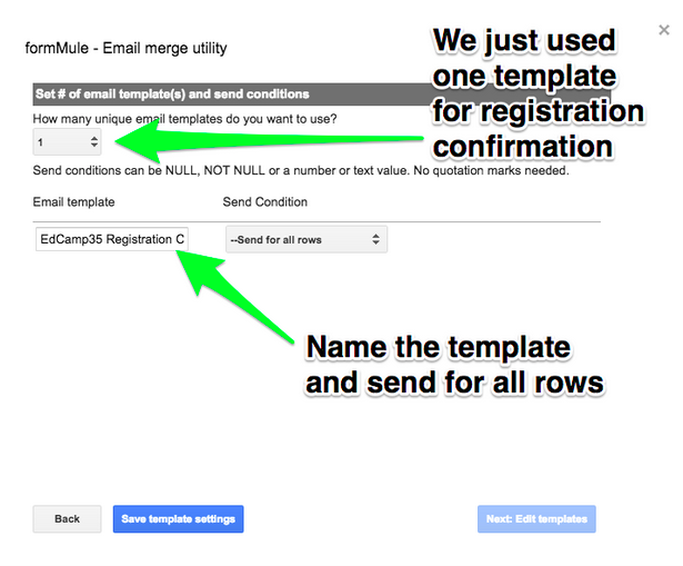
The set-up for FormMule is pretty easy and has a few steps of its own. Ensure that you set this up on the destination spreadsheet for your registration form.
First, go to Add-ons. If you don’t see the FormMule, add-on, click “Get add-ons” and search for it. Once you’ve installed it, click on FormMule, then Open.
Window 1:
Once you press “send”, you and any other organizers that filled out the form earlier should receive an email confirming your registration for edcamp within a few minutes. If you don’t receive an email, troubleshoot for the following:
- be sure to check that the “trigger on form submit” toggle is on (first step of FormMule set-up)
- that there isn’t a typo in the emails that were submitted to the form
- that the <<Email Address>> merge tag is in the “To” space of the email template
Finally, you’ll want to test out your live form with another email address. Return to your registration form and fill it out one more time (with a different email if you want to REALLY make sure). If you’ve received the registration confirmation to that address, I’d say you found success with Google Add-ons for Edcamp… Part one.
Now you could send your form link out to attendees, but maybe you are looking for more geeky Google tricks for edcamp organizing? Stay tuned on my blog for Part Two which will feature the use of the DocAppender Add-on for EdCamp35.








 RSS Feed
