• Blog
  • About
  • Digital Portfolio
  • Presentations
    • Ontario Summit 2019
    • Petaluma iOS Summit >
      • You Can Explain Everything and Your Students Can, Too!
      • Getting Going with Google Classroom
      • Capturing Student Ideas with Visual Apps
    • ISTE15 >
      • Connecting the Next Digital Leaders
      • Hacking the Daily 5
      • Passion-Based Learning: Genius Hour, 20% Time, and Innovation Day
    • DENapalooza Vancouver 2015
    • PITA15 Whistler >
      • Passion-Based Learning: Genius Hour & 20% Time
      • Screencasting for Visible Thinking & Learning
    • CUE15 >
      • Hacking the Daily 5 - Rockstar Jam Session
      • Digital Citizenship for the 21st-Century Citizen
    • Odyssey15
    • iOS Summit Vancouver 2015
    • 2014 Presentations >
      • ERAC IL4K12
      • CUEBC14 >
        • Learn How To Drive: Storage & Collaboration in the Cloud
        • SAMR: A Technology Integration Model for Educators
      • SFU14
      • Union SD Tech Innovation Summit
      • CUE Rockstar Manhattan Beach 2014 >
        • Learn How To Drive
        • Screencasting for Visible Thinking and Learning
        • Hacking the Daily 5
      • CA GAFESummit 2014 >
        • Learn How To Drive
        • SAMR: A Technology Integration Model for Educators
        • Passion-Based Learning
      • JET14
      • MERITCon14
      • ISTE 2014
      • CanFlip14 >
        • Screencasting for Visible Thinking & Learning
        • Passion-Based Learning
      • Vancouver GAFESummit 2014 >
        • Learn How to Drive
        • Passion-Based Learning
      • Walnut Grove - Genius Hour in Elementary
      • Odyssey 2014 >
        • SAMR: A Technology Integration Model for Educators
        • Explain Everything! Practical Uses and How-Tos for Screencasting on Your iPad
        • So You Want to Mystery Skype?
      • Roseville GAFESummit - Passion-Based Learning
  • Contact
A Tech Teacher on a Mission

Automating Edcamp with Google Add-ons, Part 3: Autocrat

5/25/2015

24 Comments

 
Picture


This is the final part to a three part post (and the coolest of them all, IMHO) detailing how we used Google Add-ons to make organizing easier for Edcamp35. The first post outlined how to use FormMule for confirmation emails and email updates and the second post gave an overview for using DocAppender to filter specific information from those who were willing to facilitate a session.

Add-on #3: Autocrat

Picture
Basic Add-On Description: Autocrat takes the data from a Google Sheet and renders it into an easier-to-read Google Doc or .pdf format. Additionally, you have the ability to customize the file name, type, destination folder in Drive, and you can even customize a mail merge with the documents attached! Again, this add-on for Sheets is written by the still-ever-amazing-and-awesome Andrew Stillman. (Fangirl, much? Yes. Just, yes.)


Add-on’s Function for EdCamp35: This particular workflow is my favourite use of edcamp add-on awesomeness, mainly because it allows for collaboration of your edcamp attendees. The purpose of this add-on is to automatically create collaborative session documents as the session board schedule is being finalized. Each document would be automatically created and filtered into a publicly shared folder (all documents inside would automatically inherit the folder’s sharing permissions). This way, all attendees can use the folder link to locate their session and the corresponding collaborative Google Doc to take notes on. Even better, you have a window into sessions that you were unable to attend, and to share with others later on, too!

Basic How-To:

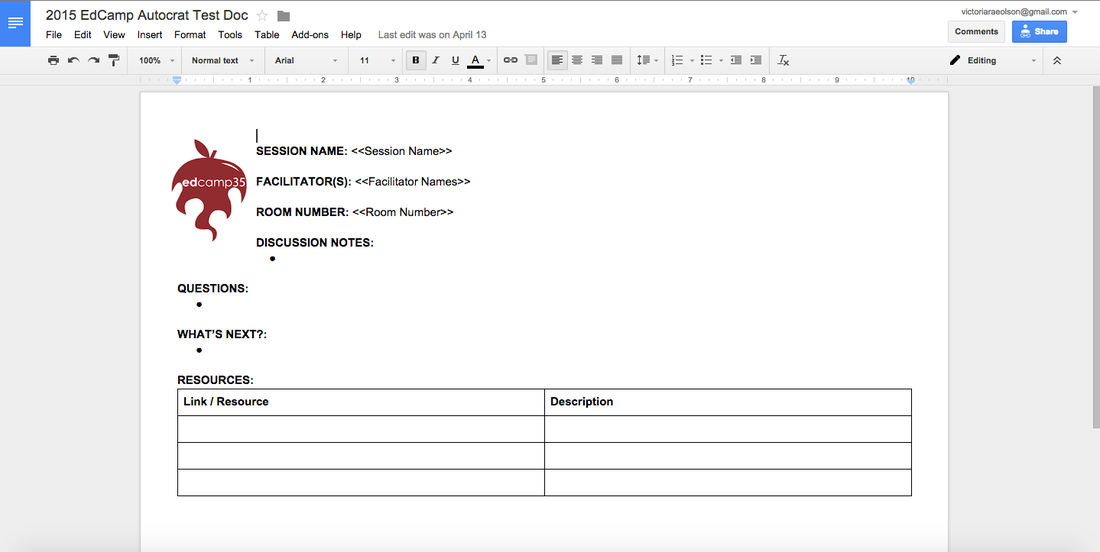
Step 1: Create a template for what you would like your session documents would look like. This year’s version looked the one below (and you can snag your own copy on Drive if you click on the image):
Picture
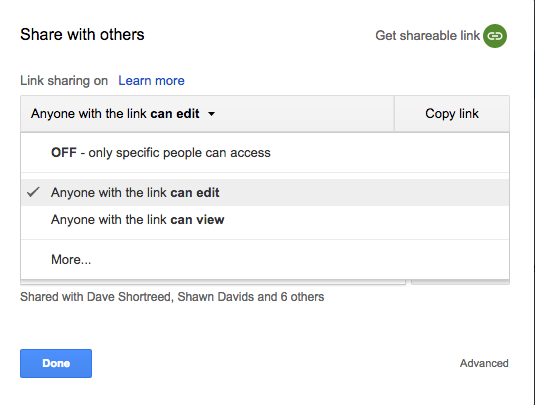
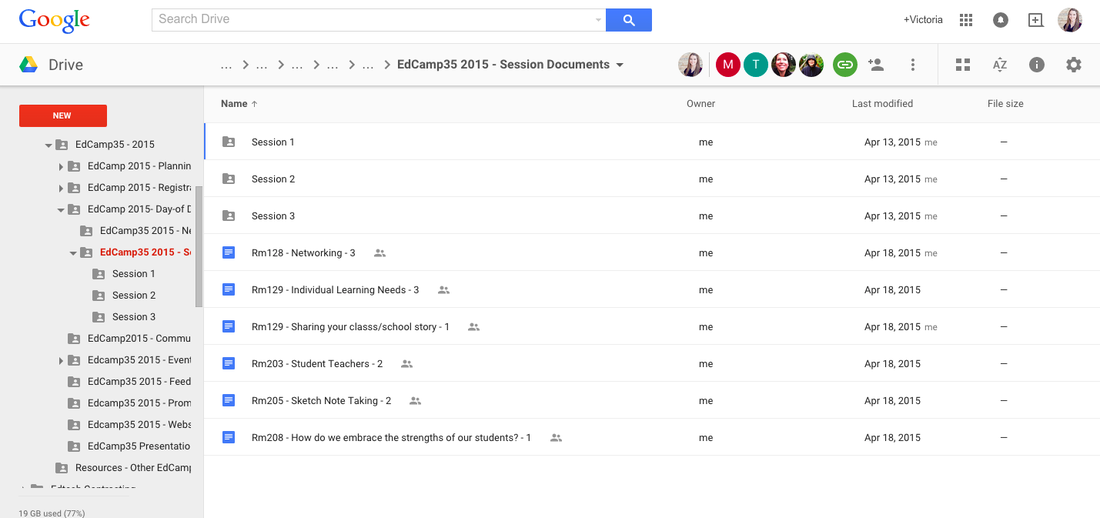
Step 2: Create a publicly editable folder in Drive where you’d like to keep the collaborative edcamp Docs. You can also create sub-folders inside of it for each session time slot that would run within your edcamp. If you make a folder for each session, it makes for easier for attendees to find the session title that they may be looking for.
Picture
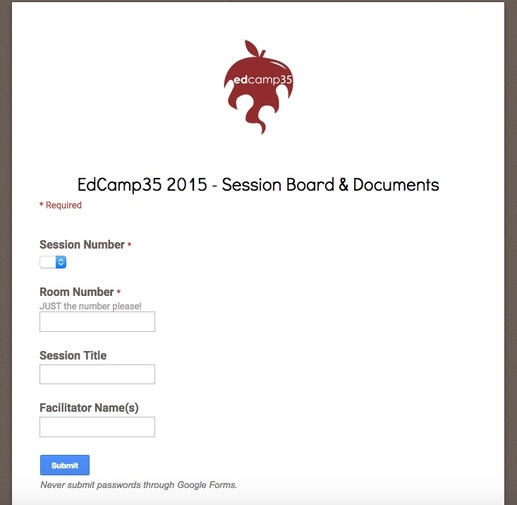
Step 3: In a different folder (for us, it was our Edcamp35 organizing folder) create a new Google Form with questions just like the ones pictured below. Add any other fields you think you might need… remember to collect everything you'll require to fill in your template doc’s fields. Here is a link to our form or take a look by clicking below.

Picture
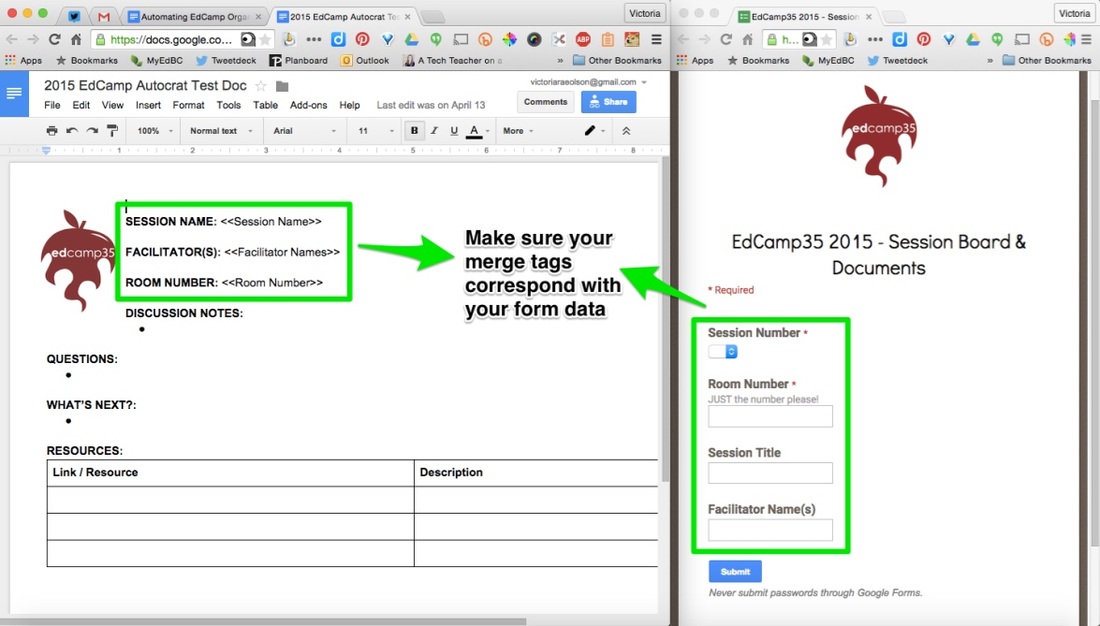
Step 4: Backing up now.... on our template document, you may have noticed these strange tags: <<Room Number>>, <<Session Name>>, etc. These are called merge tags. Wherever you add them in your template, Autocrat allow you to merge specific responses from the form into each doc that is created. For example, if I input “Genius Hour” into the form under Session Title, then I have made it so “Genius Hour” will now replace <<Session Name>> on the template document.

Now, it’s your turn! Go back to your template document and add merge tags that will correspond the data you input from your form. It’s nice to have the form and the template doc side by side (pictured below) to make it easier to correspond with one another before launching the add-on.
Picture
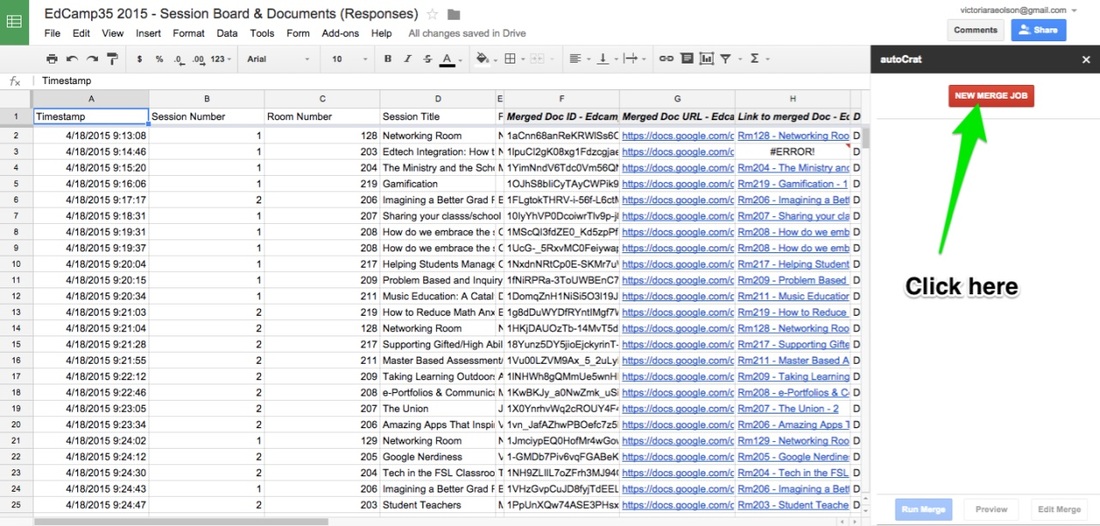
Step 5: On the Sheet that receives the form responses, I installed Autocrat in the “Add-ons” menu. Click on the “Launch” button in the menu and a sidebar will pop up for you to begin the use of the add-on. When the sidebar pops up, click "New Merge Job".
Picture

Picture
Note: This is the sheet that accepted our responses for the Edcamp35 2015. Your sheet should be empty - no data!
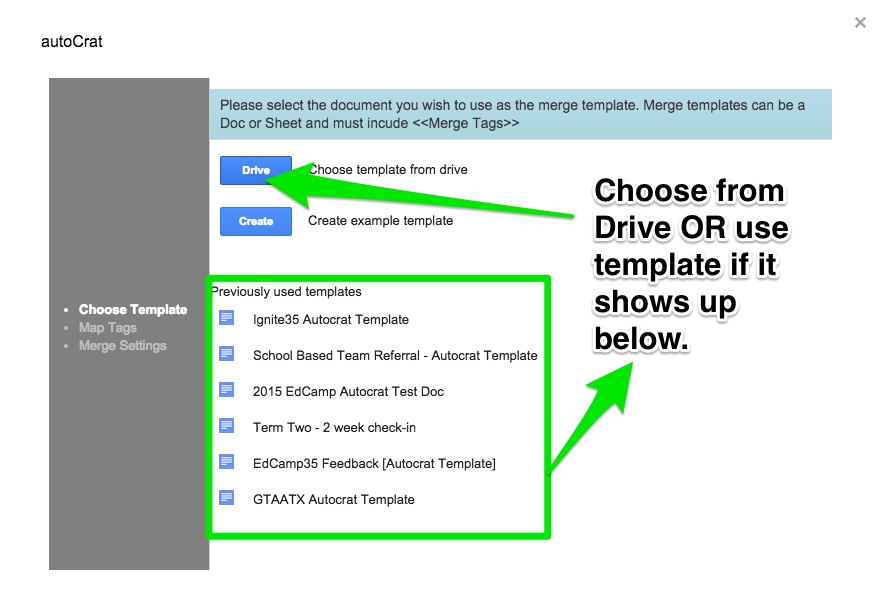
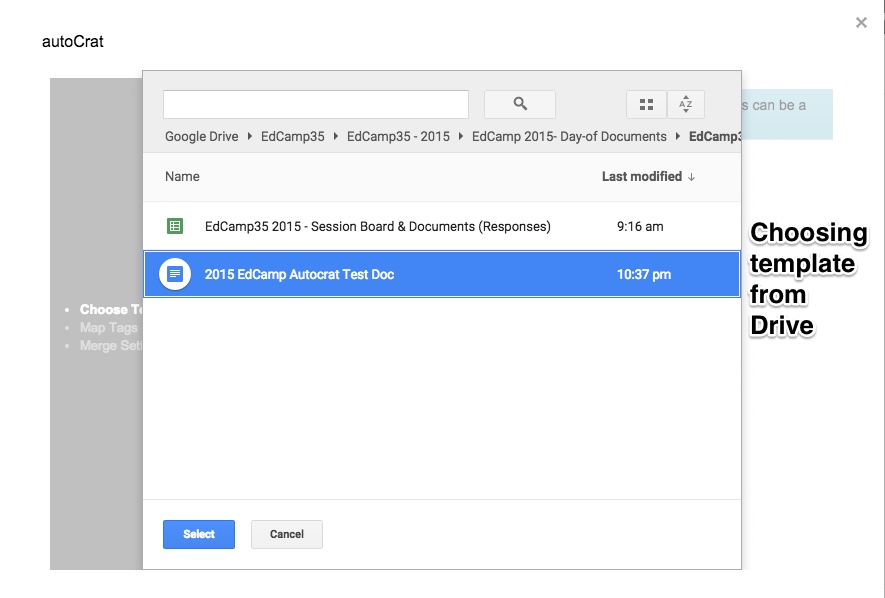
Step 6: A pop-up window will appear in your Sheet to set up the Autocrat add-on. Start by adding your template doc from Drive or by choosing a template in the document list below.
Picture

Picture
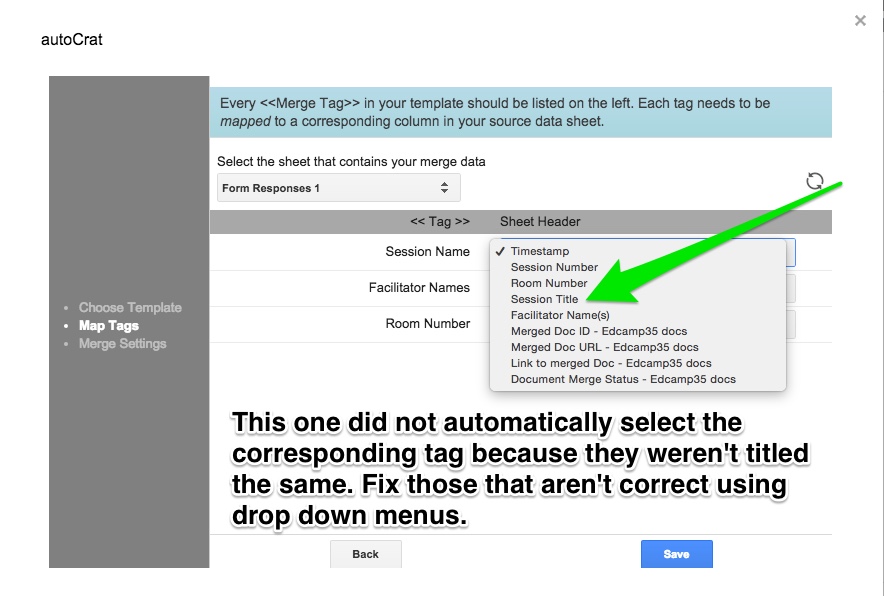
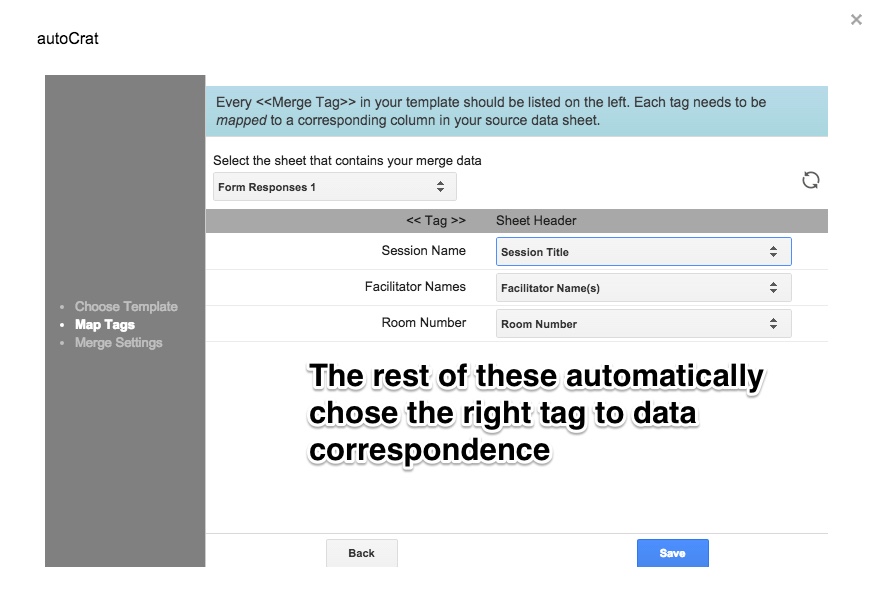
Step 7: Ensure that your merge tags correspond with the appropriate fields from your document. Some of your merge tags will automatically choose the corresponding entry from the form if they have the exact same name. Others, you will have to select from a drop-down menu.
Picture
Picture
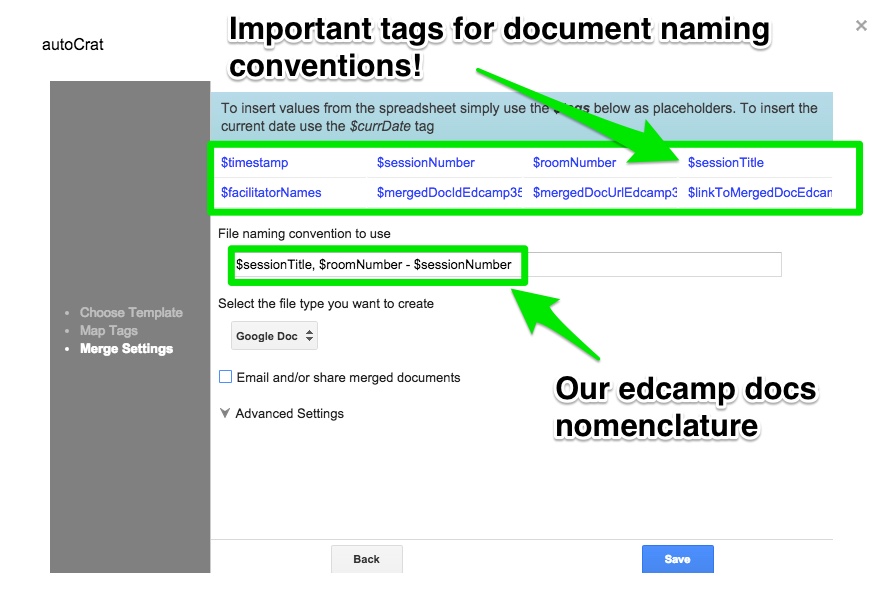
Step 8: The merge settings step has a lot of little sub-steps. First, what will your merged documents be named? You can customize this using the naming tags listed on the next step of the add-on. All documents were titled a very specific way so that they would be easy to for attendees to see and for organizers to sort (see image below). Our nomenclature for merged docs was $sessionTitle - $Rm - $sessionNumber. So, for example, a session document would come out titled as the following:

Genius Hour for Beginners - Rm208 - 3

And it would also have matching information inside of the doc where the <<merge tags>> sit.

Why did we do this? The name of the sessions is the most important aspect for attendees, so that came first. The room number is secondary. The session number was for the organizers so that we put each document in the correct collaborative docs subfolder. Remember, we had Edcamp35 Session Docs named as a parent folder and subfolders for session 1, 2, or 3. The session number in the name makes it so we don’t have to open the documents one by one to see where they should live, or continually reference the session board to figure it out.
Picture
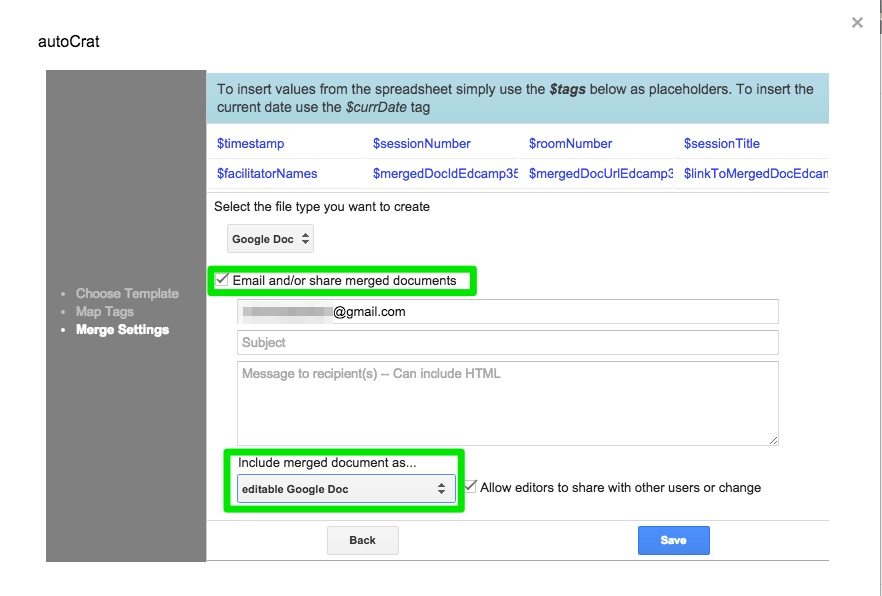
Step 9: Next, select “Email and/or share merged documents” and input your own email address (you need one; I just delete these notifications in my email later). I also ensure that it's shared as a publicly editable Google Doc, but… Google Nerd Note Reminder (as if all of this wasn’t enough already): If the destination folder is publicly editable, so will all the Docs be that are created within it. Secondary note: if you’re using Autocrat for a different purpose, you can also customize the email subject, address, and message, too!
Picture
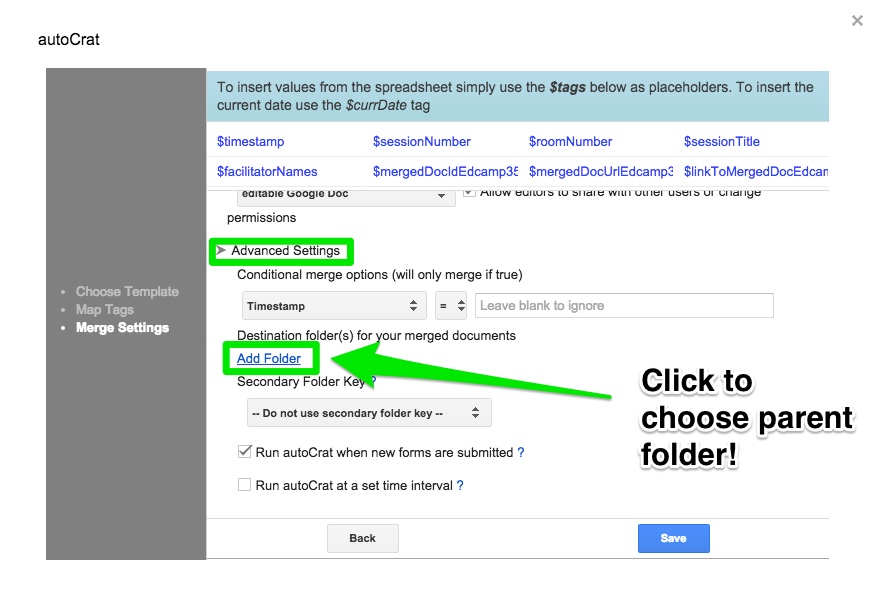
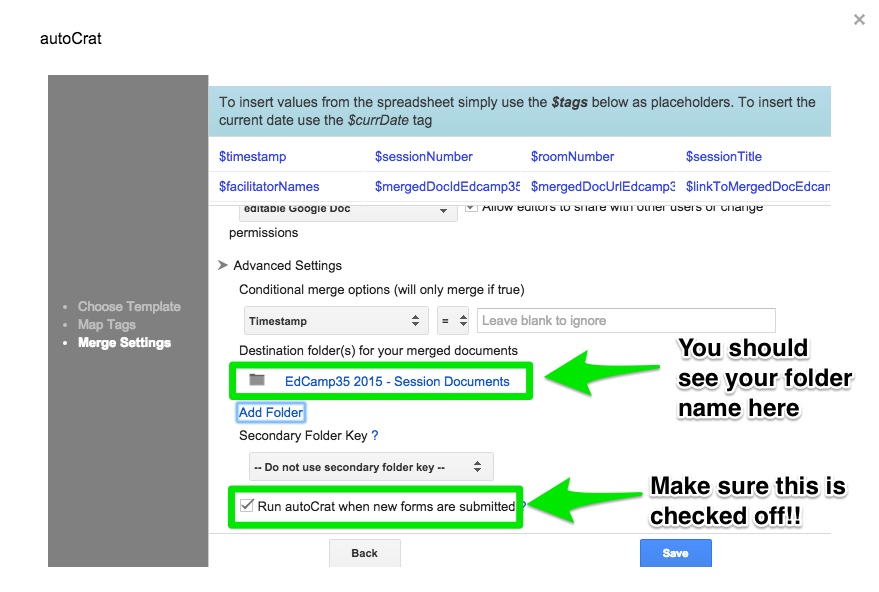
Step 10: Click to expand the Advanced Options menu. This is where you can ensure that the Docs being created would land in your appropriate parent folder. Make sure that “Run autoCrat when new forms are submitted” is checked off before pressing “Save".
Picture

Picture
Step 11: Test out the magic by filling out your form. Check the merge folder you chose to see if the document merged. You should also see the evidence of a merge on the response spreadsheet - clickable links and a merge confirmation field.
Step 12: Delete any test documents you created and double check that your parent folder is shared to be publicly editable. Share the folder link on the morning of edcamp or before so that people can access it. For Edcamp35, we created shortened URLs for this as well as QR codes for participants to scan around the building to get connected with our collaborative documents.
Picture
Step 13: We repeatedly filled out the form with session titles and rooms on the day of the edcamp in a frenzy as the session board was being built. After the documents were merged into the parent folder, we had to drag and drop each session into its corresponding session subfolder. Note that this is best done in “List View” in Drive, not "Grid View”.
Picture
Each of these documents would get dragged and dropped into the appropriate session folder.
If you’re curious what the final structure might look like, check out our final merged products from Edcamp35 here. Some documents got edited by attendees during the conversations, others didn’t. But what we created was a shareable source of evidence of professional conversations that others could learn from. The coolest part? I learned from sessions I didn’t even attend, and so did many others! And it didn't really take that long to set up, either.

I really hope you enjoyed learning about Google Add-ons for Automating Edcamp from this series of blog posts. Thank you for planning amazing educational events (or being curious about it!) and being a part of growing professional practice through sharing and collaboration!
Picture
24 Comments

Automating EdCamp with Google Add-ons, Part 2: DocAppender

5/15/2015

1 Comment

 
This is the second part to a three-part post detailing how we used Google Add-ons to make organizing easier for Edcamp35. To see the last post on using FormMule for confirmation emails and email updates, please click here.

Add-on #2: DocAppender

Picture
Picture
*Note: Designing your form well is really important when using the FormMule and DocAppender add-ons. While DocAppender is less likely to be used in the case of edcamp, it can be helpful!*

Basic Add-On Description:
DocAppender takes the data from multiple choice questions and populates corresponding information you specify into a Google Doc of your choosing.   This add-on for Google Forms is also written by the ever-amazing Andrew Stillman (like all the ones I use!).

An example question in a Google Form might be: Do you want cake? Answer options would include “Yes” or “No”. Google Docs named “Yes” and “No” would be used to store information as it was collected. You could choose to include all the names of people who wanted cake as well as the cake flavours they’d like, giving you a nice slick list after all of the forms are filled out. The document literally gets appended every time someone completes the form, thus the name “DocAppender”.

Add-on’s Function for EdCamp35: To collect data on who would be willing to facilitate sessions and what kinds of sessions they would be willing to facilitate. In edcamps past, we have lacked facilitators in several of our rooms, and new edcampers didn’t know where to start. With our DocAppender list of facilitators, we were able to identify which sessions didn’t have facilitators and we tapped those folks on the shoulder to step up and get those conversations started. This also could be used to track food allergies or requirements if you’re providing lunch, but we used food trucks instead.

Basic How-To:

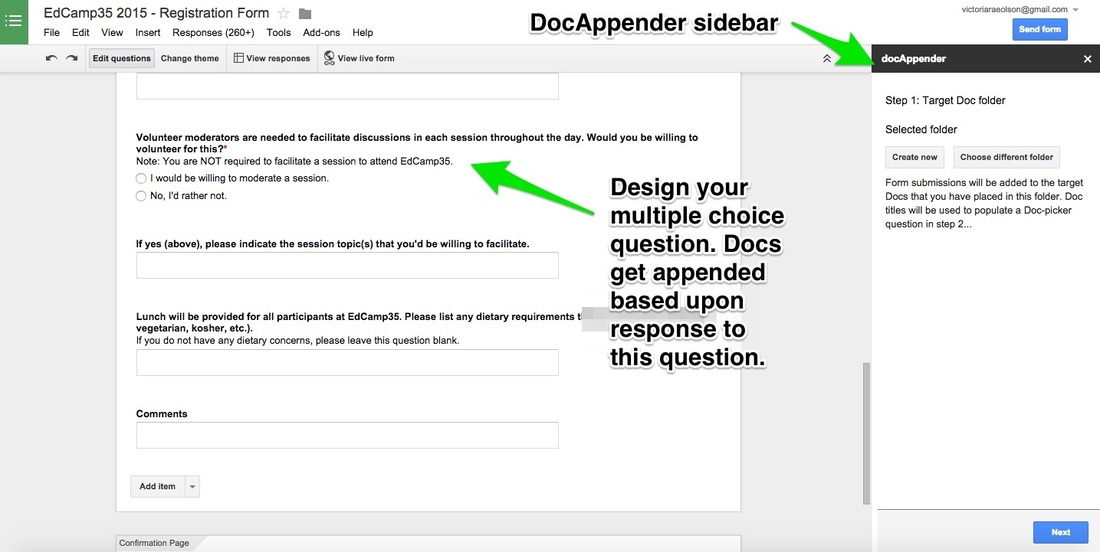
Step 1: Find and install the DocAppender Add-on in your Google Form.
Picture
Step 2: Create your edcamp registration process through a Google Form - you’ll have to coincide this step with the original set-up of the Google Form from my first post.

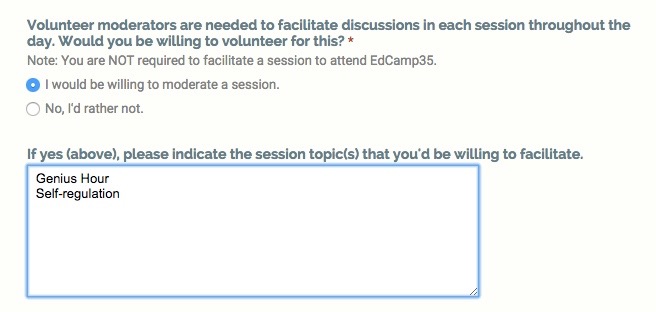
To do this, we created a mandatory question asking, “Would you like to facilitate a session?”. Upon signing up, participants had to choose either
  • “Yes, I would be willing to moderate a session.” OR
  • “No, I’d rather not.”
Picture
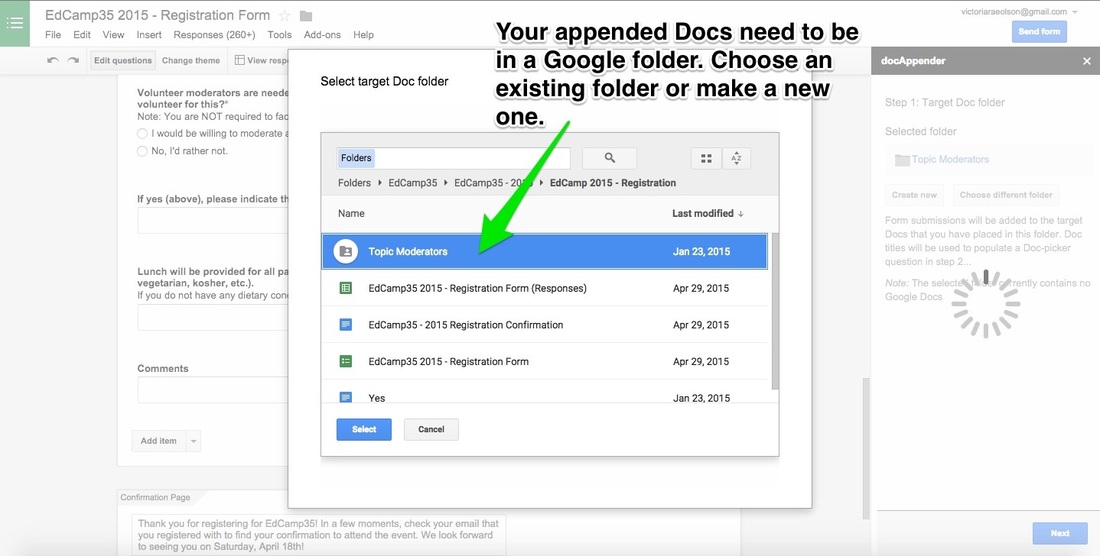
Step 3: Create or choose a Google Drive folder that will hold your documents to be appended. After you select your folder, click the "Next" button on your DocAppender sidebar.
Picture
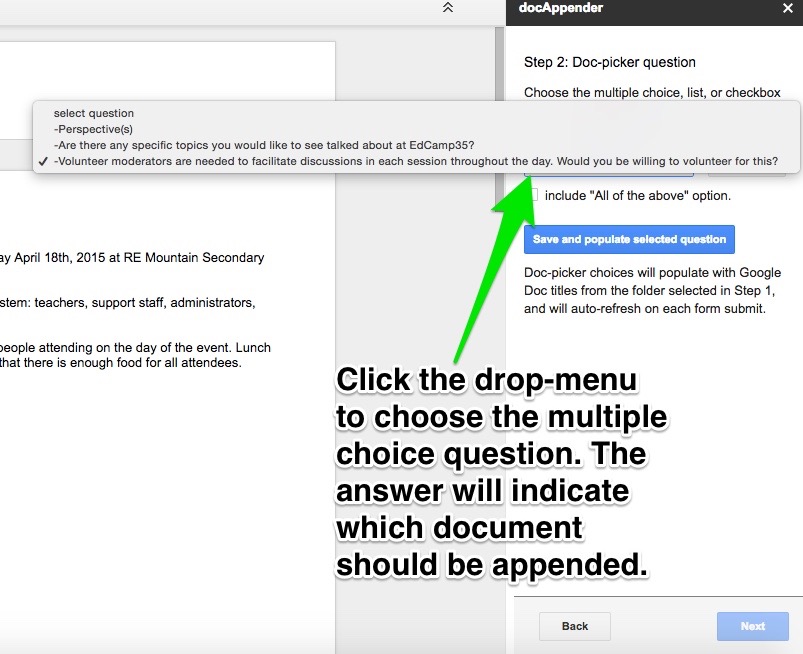
Step 4: Indicate which multiple choice question you would like to create documents for. Google Docs will be automatically populated for you within the folder you chose when you click the “Save” button. These Docs will be named exactly as the responses to the question you’d like to collect data on. Our answers were: “Yes, I would be willing to moderate a session.” or “No, I’d rather not.”, so our Google Docs were called the same thing. Click "Next" when you're done.
Picture
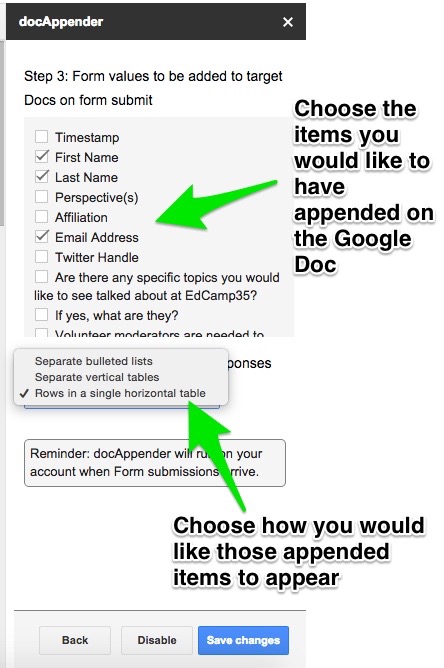
Step 5: Choose all of the data on your form you’d like appended to each document and how you would like it to appear. Every time a response is submitted, that information would get populated into each document. We only really needed data from one of the responses, but you have to collect both anyways. Click "Save Changes" to complete the set-up.
Picture
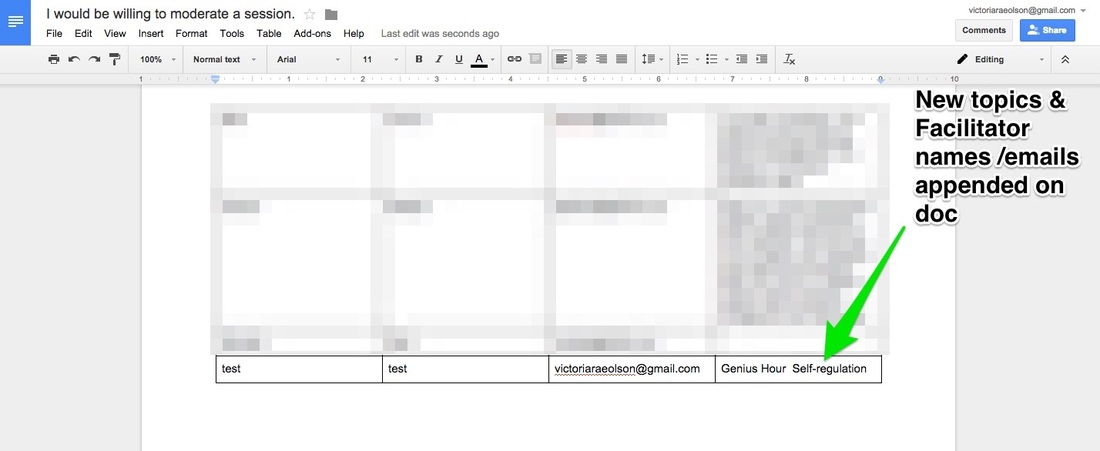
Step 6: Fill out your form to do a test run of whether or not it worked (remember which response you select!). Check by opening the Google Doc with the response you entered. It should have appended the data you indicated in the set-up!
Picture
Picture
For our use with Edcamp35, when a response was submitted, anyone who said “Yes” to facilitating a session would automatically have their name, email addresses, and suggested topics saved in a table on the “Yes” doc. Our organizing team could then contact specific attendees regarding anticipated sessions that might be harder to find facilitators for. 

After testing and tinkering to make sure it works, your form link should now be fully ready to send out to attendees! If you are looking for more geeky Google tricks for edcamp organizing, stay tuned on my blog for Part Three which will feature the use of the Autocrat Add-on for EdCamp35! 
Picture
1 Comment

Automating EdCamp with Google Add-Ons, Part 1: FormMule

4/29/2015

8 Comments

 
Picture
Earlier this month, our organizing team put on the 2nd annual EdCamp35 event held at R.E. Mountain Secondary in Langley, BC. The event seemed to be a success, from the wonderful feedback from participants as well as the excited buzz that continued into the following weeks.

While many people pitch in to make edcamp possible, it should be known that there are a number of technology tools that make our jobs easier, too! I used 3 Google Add-Ons to automate our edcamp planning this year. 


This blog post will be the first of a three-part series that will outline how to use Google Add-Ons for edcamp organization ease! I will be covering our use of FormMule, DocAppender, and Autocrat for EdCamp35. 

Add-on #1: FormMule

Picture
*Note: The first two add-ons that I will cover rely on one another, but FormMule is more likely to be used than DocAppender so I’m covering it first.*

Basic Add-On Description: FormMule is an add-on for Google Sheets written by the amazing Andrew Stillman. It is used to send specific mail merges through the creation of customized message templates. FormMule allows the inclusion of merge tags - if a participant inputs their first name into the form, their first name will automatically appear where the <<First Name>> tag is located within the email template. Finally, it can be set up so that as soon as new data is added to a Google Form, the destination Sheet will automatically send the email to the person who filled out the form.


Add-on’s Function for EdCamp35: To send automatic registration confirmation emails to attendees as soon as they register. This kept us from having to deal with writing dozens of emails saying - “Yes, you’re registered, don’t worry!” It also gave participants the preliminary information they needed regarding details for the day of edcamp.

Basic How-To:

Step 1: Create your edcamp registration process through a Google Form

You can take a look at EdCamp35’s copy here and use it as a springboard for creating your own. Make sure you are collecting all of the information you’ll need from attendees, particularly full names and an email address. As soon as your Form is created, a Sheet will be automatically created and will be the destination for your registrants’ data.

Fill out your own form right away to test it out. This is an extremely an important step for later. If you want to fill it out more than once with your own information, or have your co-organizers do the same, that’s fine.


Step 2: Write the template email that you would like attendees to receive

Provide your registered edcampers with some peace of mind that they have, indeed, successfully registered for your event. You don’t have to get fancy with this; including only necessary information in this initial email is okay. Please note that if you want to get fancy and include hyperlinks and images, they will have to be written in HTML in FormMule. Here is a copy of our registration confirmation template if you want to use it as a model for your own.


Step 3: Set up the FormMule add-on

The set-up for FormMule is pretty easy and has a few steps of its own. Ensure that you set this up on the destination spreadsheet for your registration form.

First, go to Add-ons. If you don’t see the FormMule, add-on, click “Get add-ons” and search for it. Once you’ve installed it, click on FormMule, then Open.
Picture
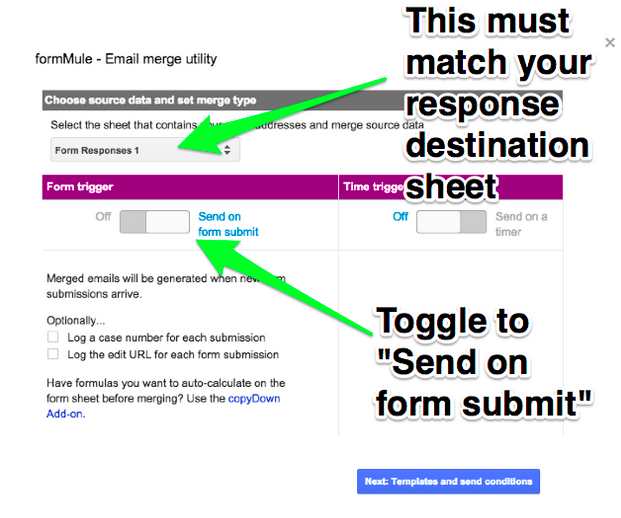
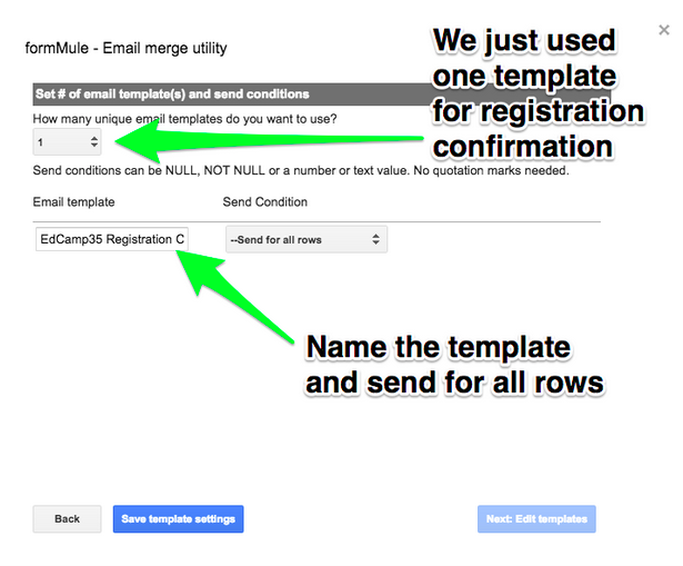
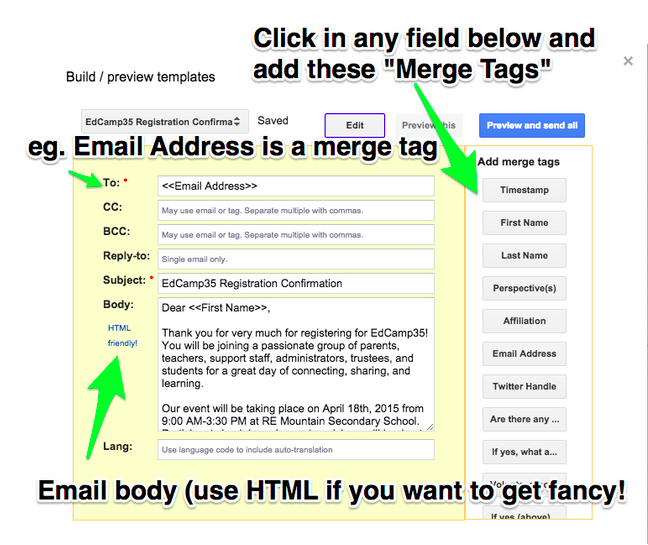
A window to run the FormMule add-on will pop up and you will have to go through the steps to set it up, but it’s pretty straight forward. All of the steps as we used them are outlined in the following images.

Window 1:
Picture
Click "Next: Templates and send conditions" which will take you to Window 2:
Picture
After this step, click “save template settings”, then “Next: Edit templates”. Window 3 should appear, where you can edit your email template:
Picture
Finally, click on “Preview and send all” to take a look at your handiwork. If you’re happy with the preview you see, press "send all". If there is something missing or doesn’t look right, use the back button to review the steps to fix it.

Once you press “send”, you and any other organizers that filled out the form earlier should receive an email confirming your registration for edcamp within a few minutes. If you don’t receive an email, troubleshoot for the following:

  • be sure to check that the “trigger on form submit” toggle is on (first step of FormMule set-up)
  • that there isn’t a typo in the emails that were submitted to the form
  • that the <<Email Address>> merge tag is in the “To” space of the email template

Finally, you’ll want to test out your live form with another email address. Return to your registration form and fill it out one more time (with a different email if you want to REALLY make sure). If you’ve received the registration confirmation to that address, I’d say you found success with Google Add-ons for Edcamp… Part one. 


Now you could send your form link out to attendees, but maybe you are looking for more geeky Google tricks for edcamp organizing? Stay tuned on my blog for Part Two which will feature the use of the DocAppender Add-on for EdCamp35.
Picture
8 Comments

How To Create Your Own Digitized Fonts (Students Can, Too!)

4/23/2015

6 Comments

 
One of my students has been tirelessly writing a book for her Genius Hour project. She has designed the entire layout through storyboarding and has rough illustrations and a manuscript ready to go. She has even hand-drawn her own typography which the story will be written in.

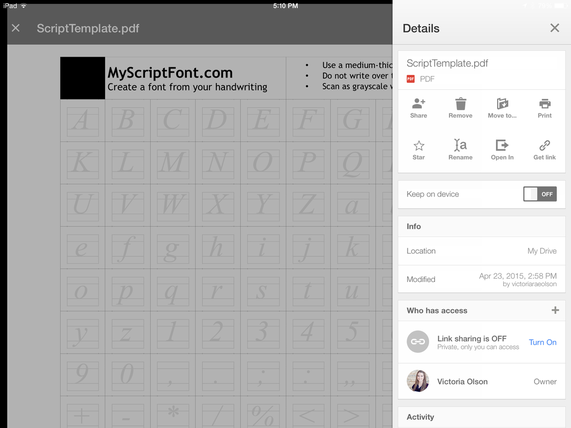
It gets better: One of her classmates’ parents took her typography and turned it into a digitized font. She showed me the file on her Google Drive which had a .ttf file extension name and looked like this:
Picture

Installing the Font

Picture
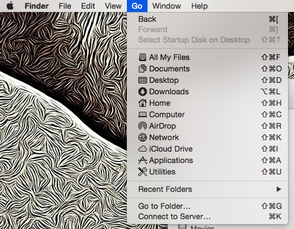
Finder > Go > Computer > Macintosh HD > Library > Fonts

First, I had to know how to put it on my own computer. On my Macbook Air, I downloaded the file and from my Finder window, I clicked on “Go” in the header menu and clicked on "Computer". In the menu that opened, I clicked on Macintosh HD > Library > Fonts. I then dragged the downloaded file into the Fonts menu, and voila! I was able to use it immediately as a choice in Pages, MS Word, and other OSX apps that allow you to choose your own font! 


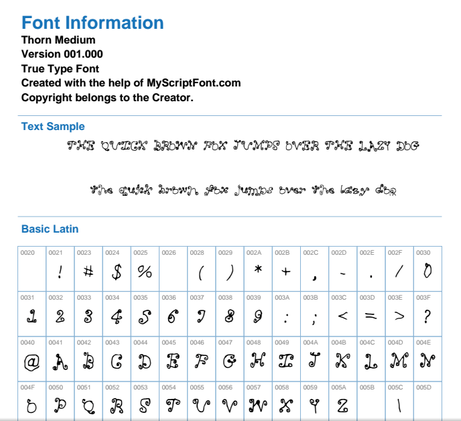
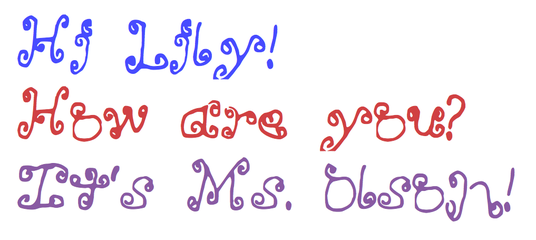
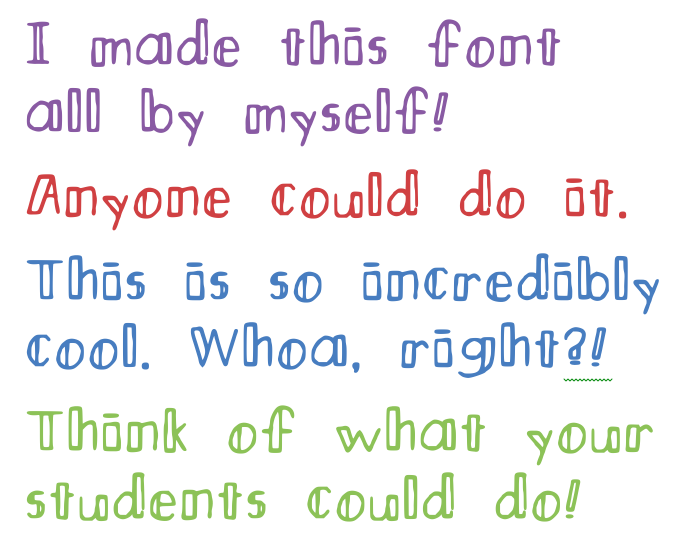
Here is Lily’s font:
Picture

So then I got thinking: how hard could this be? Lily took care of the artistry, but could a teacher deal with the workflow that students would have to go through to digitize it? Or could students do it, too? I quickly found out that both are true because I made my own font using MyScriptFont.com too! 

How to Make Your Own Font Digitally

1. Go to MyScriptFont.com and download the available font creation template. You can move the file into the cloud to easily transfer to digital annotation apps, which is what I will outline here. (If you’re not confident with digital workflows, you can print the template, have students fill it out in pen, and scan it to upload to the website.)

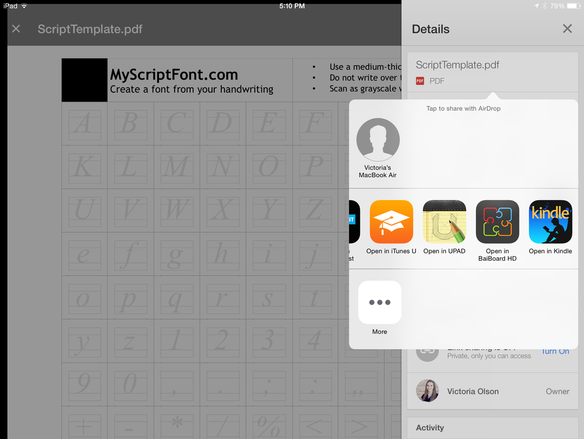
2. I first saved the file in Google Drive and opened it using the UPAD app on my iPad.
Picture
Saved in Google Drive, tap on the "i" and "Open In..."
Picture
Select your .pdf annotation app of choice. I used UPAD.
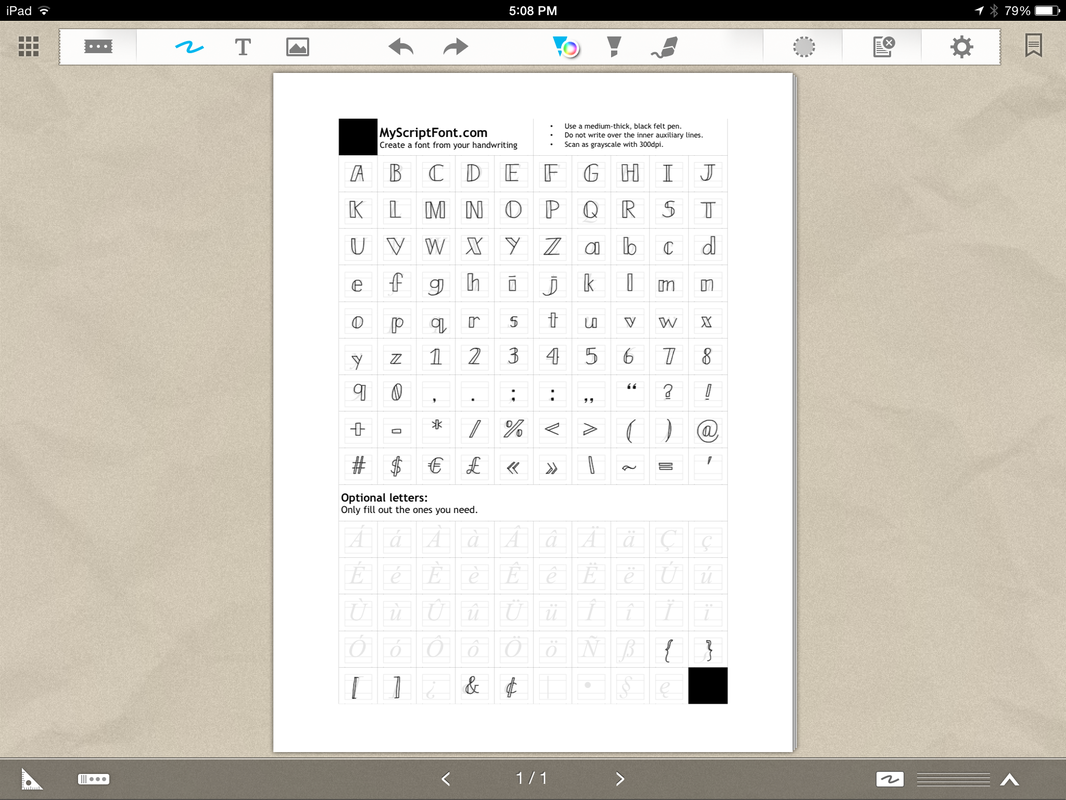
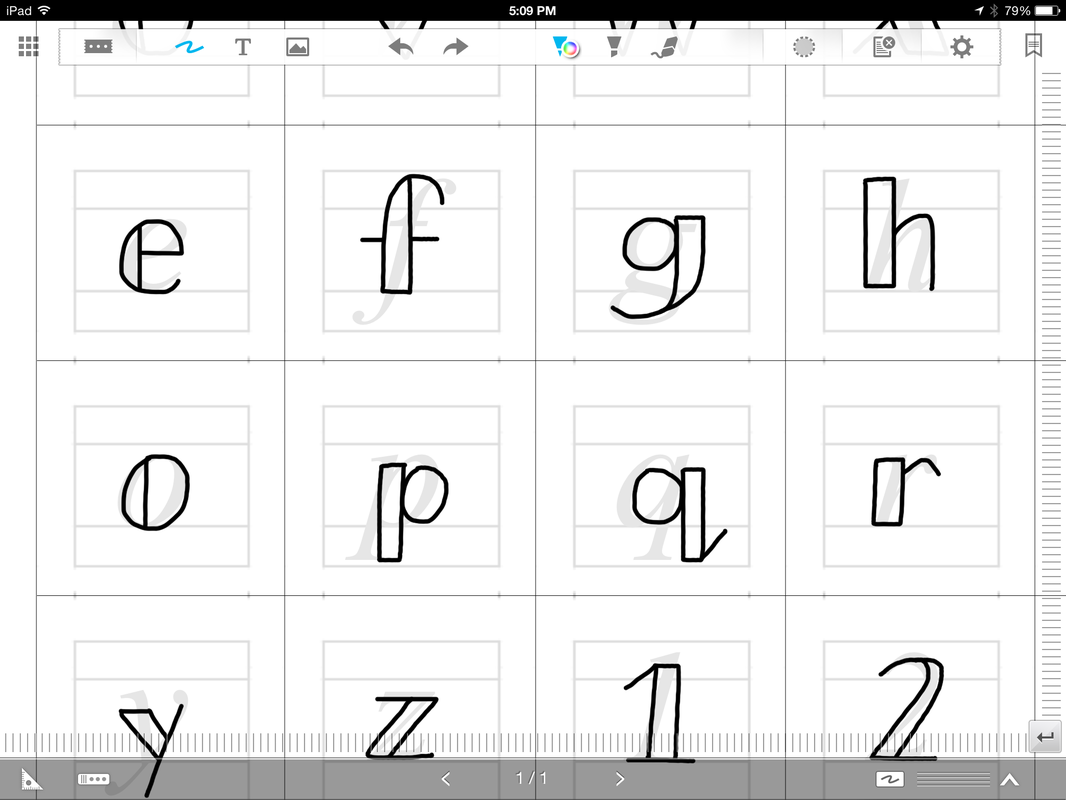
3. UPAD allows me to pinch and zoom easily and use beautifully sleek pen tools to create my typography. Using a stylus for digital font creation is helpful, too! Note that the letters on the template will guide you to know which letters to draw in which boxes, but this can cause interference when drawing. I anticipate this would be a bigger problem in younger classes than in older classes.
Picture
Full view of typography I created in UPAD.
Picture
Pinching and zooming within UPAD allows me to draw with precision.
4. After my drawings were complete, I had to export my work back to Google Drive so that I could access it on my Macbook again. I took the file and uploaded it to MyScriptFont.com, where it converted the .pdf into .ttf format. As soon as I installed it on my Mac (using the same steps for installing a font as above), I could use it in Pages, MS Word, etc. WOW! So, so, so easy! 
Picture
So there you have it - teachers and kids could totally do this! Imagine the impact on a struggling writer as they see their own handwriting light up a screen. How motivating! 

Please share screenshots of any fonts your students create with me on Twitter! Happy designing!
Picture
6 Comments

Empowering Student Voice Through Building Community

3/22/2015

2 Comments

 
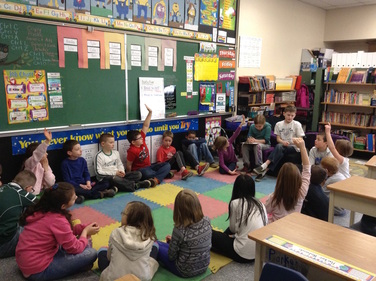
PictureClass Meeting, completely run by Grade 3/4 students
I survived the midterm (university)/end-of-term (work) onslaught of balancing papers and report cards and presentations. Now, Spring Break is here (well, it’s technically been here for a week, but I’ve been busy!) and I’m happy to be home after a solid CUE15 conference, and looking forward to a week of rest and slow-moving Masters work with no other obligations. I was glad to turn to #YourEdustory to find this prompt:

“How do you empower student voice in your classroom or school?”

At first, I thought this was an easy answer: I share.

But maybe, just maybe, it’s more than that. I finally landed on this: I help to build communities in which my students and teachers are empowered to share, too. This is necessary before sharing even begins. And truthfully, it’s something I’ve always been passionate about.

In my classroom, I allow students to govern the rules and regulations of the environment through weekly Class Meetings. Students learn to listen to one another, to empathize, to consider frustrations from another’s shoes, and to work to make the environment better for all involved. Students also are in charge of leading the daily activities, jobs, and regular routines such as opening, calendar, shape of the day, line-ups, and more. Every student gets opportunities to lead; in fact, they make rules about making sure it’s all done fairly in class meeting! They get to see the iterations of their governance in action, which validates their voices.

Students also create content unique to their understandings and thinking, and are provided with the choice to share them beyond the walls of our classroom. Public sharing allows them to learn how to be positive digital citizens when blogging and using social media. Technology makes it easy to break down the walls and amplify the stories of positivity that our communities hear about their children. And they - the community and the students - love to interact with one another online and in person to practice those skills, too.

If students have something to contribute and can see their ideas reverberate in practice, they feel validated as contributors to that community. Sharing those stories simply changes the audience that sees those ideas.

Picture
2 Comments

Why I Do What I Do? - It's the Little Things

2/17/2015

2 Comments

 
“People don’t buy WHAT you do, they buy WHY you do it.” - Simon Sinek
PicturePhoto by Kieran Lamb on Flickr
This week’s #YourEduStory prompt: The above quote, followed by: “Why do you do what you do?” This is a solid question for anyone, not just educators. I believe that we should all have a defining purpose behind our life’s work.

My purpose is for wanting to make education absolutely AMAZING for my kids is this simple: I’m never completely satisfied. As much as I have no trouble finding celebrations to be had in the growth of my students (and my own growth, too) I never want to settle. I never want to stop and say, “Yeah, that’s good enough”, and then recycle that lesson for the next 30 years. I push myself to do more and I do that constantly.

This comes from one little story from my student teaching days: my school advisor told me she made a mistake in what I considered to be a flawless lesson. When I asked her what she would improve on, she replied, “I left the handouts at the back when I was instructing at the front.” WHAT? That’s it?

As a then-novice teacher, I watched more closely and realized how the little things can take something from being good to being great. It’s not always BIG things that need to change. Sometimes it’s tiny things. Like changing ONE WORD in an instruction for a student that requires differentiated support. Like actually letting my kids be in flow instead of constantly interrupting it. Like pacing how I transition students to get materials.

I digress. These are little things.

But little things can make a big difference sometimes. And I’m not satisfied with the little things yet, either.

Picture
2 Comments

What is the Best Thing in Your Classroom?

1/26/2015

2 Comments

 
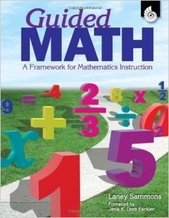
PictureGuided Math - Laney Sammons
When I first got asked this question last summer, my mind started reeling: What is the best thing that I do with students? At the time, I would have said that the Daily Five program that I had built up over the last school year was my best thing. Kids were (are) provided with choice to access a myriad of literacy activities and to self-regulate themselves through the process of completing them.

I could write about Daily Five here. Easily. But that would mean that since I was first asked this question that I haven’t tried to rival my best thing with improvements to a new thing. So with all of this thing-logic in mind, Daily Five is not what I’m going to write about.

The reason is this: ...Last year, I would have also said that math was my weakest thing. It wasn’t good at all. As in, embarrassingly not good.

This year, I set out to make it my best thing, or as close to the best thing as I could get. I have changed and am still changing so much of my math instruction. This is all thanks to some helpful workshops and discussions with my district’s numeracy instructional support, Deanna Lightbody, and from reading Guided Math: A Framework for Mathematics Instruction.

Now, in full disclosure, I am far, far, FAR from the goal of making this my best thing. But I feel that, just like Daily Five, I found a place where kids are self-regulating between choice stations to immerse themselves in learning about numeracy.

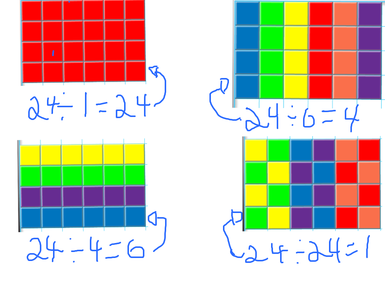
PictureA sample of an open ended question
The first steps to making changes in my room included those that changed my mindset on how to be an effective math instructor … not particularly the making or creation of the stations themselves. These shifts were:

1) Opening up questions for ultimate accessibility

Math as adults know it often operates around the concept of question = answer, and usually only one possible answer. Deanna encouraged me to think of questions with multiple answers which in turn made it so students of wider ability levels could access the question in a challenging way. 

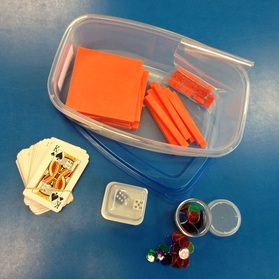
PictureOne of my student's Math bins
2) Personalizing Math Tools for Each Student

My students each have their own personalized bins with manipulatives or tools that they may require for specific whole group or small group activities, games, or stations. They access them whenever they want to and are not restricted to using the same materials as their neighbour.

3) Opening Up the “Help Desk”

While stations are going on and are running smoothly, I always open up the “Help Desk”... my fancy way of saying “come to the back table where I’m hanging out so we can work through some examples together”. This allows me to see the kids who want to see me to review or extend lessons, but also is a place to call small groups who require extra support. 

4) Teaching Whole-Group Lessons in 15 Minutes OR LESS… and Getting Out of the Way! 

Ah, the mini lesson. This took some getting used to considering most of my math instruction last year was entirely whole-group (cringe). I now spend maximally 5-7 minutes modelling with manipulatives while the kids follow along. I follow up by getting the kids up front to share their strategies and solutions to open-ended problems. I see tons of kids strengthening their understandings through these small sessions because they’re: a) bite-sized; b) driven by peer strategies; and c) hands-on. I also do a lot of quick formative assessment at this time; when the kids are in the front, I can tour around, observe, take some quick mental notes on who needs to see me at the Help Desk the next day.

While Daily Five is still likely my "best thing", I am very excited that the Guided Math program I’ve been building up will soon be fit to rival it. And I’m also excited that I no longer dread teaching math in any way.

Until next time, 

Picture
2 Comments

What Am I Doing To Make the World a Better Place?

1/14/2015

4 Comments

 
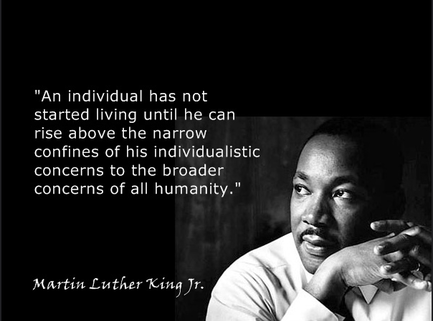
PictureI'm not there yet, Dr. King, but I'm trying! (Image credit: Emmanual Gonot on Flickr)
**Distractor/Disclaimer: I posted two blog posts in one week! The world may or may not be over as we know it.**

I often get made fun of for never writing blog posts. Now the antagonists will turn their forces - ahem, #EduPressure - elsewhere. At least for now.

**Resume serious post**

This week’s #YourEduStory poses a challenging question. This question is one where I feel that my answer should be incredibly groundbreaking, honourable, or innovative. When someone says “make the world a better place”, don’t you immediately envision some of world’s greatest and most iconic human beings and/or their associated movements?

I sure do. And that’s a lot to measure oneself up to, especially a I’m-only-in-my-fourth-year-of-teaching-and-just-coming-into-myself kinda girl. That’s me. I’m not groundbreaking, honourable, or innovative by those high standards.

So I decided to give myself a break. I don’t have to be those things. I do have to be me. I do have to work with what I’ve got.

What I’ve got right now to offer the world are just little things. Karl says to me all the time, “It’s the little things,” and I am led to believe that those little things can make an impact on little worlds - worlds of kids and worlds of teachers. In turn, my hope is that those little things can have an impact on the big world.

PictureImage credit: guercio on Flickr
Here the little things I offer that might make an impact: 

For the kids:

I have the ability to make small strides in how I support my students. I make a difference by continually encouraging them even when they’re not doing so well. I have opportunities to turn their attitudes around toward an academic concept at school, or to get them to open their views to the world in new and exciting ways. 

For teachers: 

I’ve been working on teaching little tech-tricks to teachers make them more excited about technology. Even when it’s completely about us as educators, we go crazy for new tricks that make us look tech-savvy. And that’s the thing I’m making teachers realize: playing with technology and finding ways to utilize it makes us proud to use it. That, in turn, may motivate us to use it more, to experiment more, and hopefully in new and different ways with students. 

For me:

I’m trying to take better care of myself in 2015. I’ve said NO to so, so, so many opportunities because I need to let myself have more time. I want to dedicate time to my friends and social engagements. I want to watch TV sometimes. Oh, and sleep… that, too. 

So there you have it: I’m not making the entire world a better place by creating massive human movement. But I’m making the worlds of some big people and some little people better by doing what I love and trying to do it well. And I’m glad that I’m taking time to extend that gift to myself, too.

Picture
4 Comments

My One Word for 2015 - #YourEduStory

1/11/2015

2 Comments

 
PictureChange. by flightlessXbird on Flickr
Happy New Year everyone! Okay, so I’m 11 days late, but let’s be honest, blogging wasn’t really my thing in 2014 and I have to start somewhere, right?! 

I NEED to do more with my blog in 2015. So I signed up for  the #YourEduStory blogging challenge earlier this week thanks to the ever-wonderful Jo-Ann Fox. And while I don’t know that I’ll be able to complete the challenge (sanely) every single week, my personal challenge is to do it every two weeks at the very least.

Week 1, which I’m already posting late for, suggests that we write about our “one word” for 2015. Tia Henriksen and Tracy Cramer have also issued a similar challenge for my school district. The basic premise is to choose a word that we try to live by each day for the entirety of the year.

Initially, I began thinking that my word for the year should be “change”. Change is something that is constantly happening as I push myself, my students, and the teachers I support to try new things.

But change didn’t seem like a good enough word. After all, it was the attitude I took toward change that was the important aspect to focus on. With that thought in mind, I landed on the word flexibility for 2015. 

PictureEDIT: I added this sketchnote after the original posting. It is being used for our district's #OneWord for 2015 Challenge.
Flexibility works in so many ways for me: 

In the classroom: One of the best things a good teacher can do is roll with the changes and make them meaningful for the students. An authentic sidetrack can become a very powerful learning opportunity and I want to continue getting better at finding strength in this part of my flexibility. 

Mentorship: Having a student teacher means that I need to spend a lot of time mentoring which doesn’t always land at a specific meeting or collaborative time. Often, questions are at “just-in-time” moments that require flexibility and focused attention. 

Coaching: Needs of teachers are so varied across our staff. In order to reach everyone, I need to be empathetic and flexible to each and every skill level.

Personally: I have been striving for more social time as I continue to balance the myriad of professional commitments that I have taken on. When opportunities to see my friends have arisen, I’ve been taking advantage of them and letting professional work wait instead of taking rainchecks… and that feels good! That needs to keep going even when I get caught up in the midterm mess.

So there you have it: my first post of 2015, and here’s to many more! Happy New Year!

Picture
2 Comments

#GTAATX: Not Just a Badge

12/9/2014

7 Comments

 
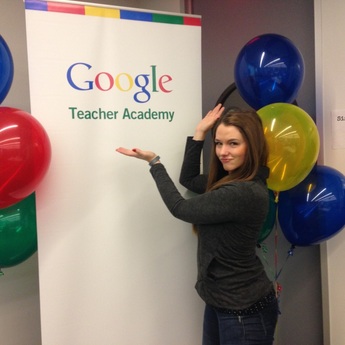
PictureMe, the sign. Photo cred: Geri Feiock
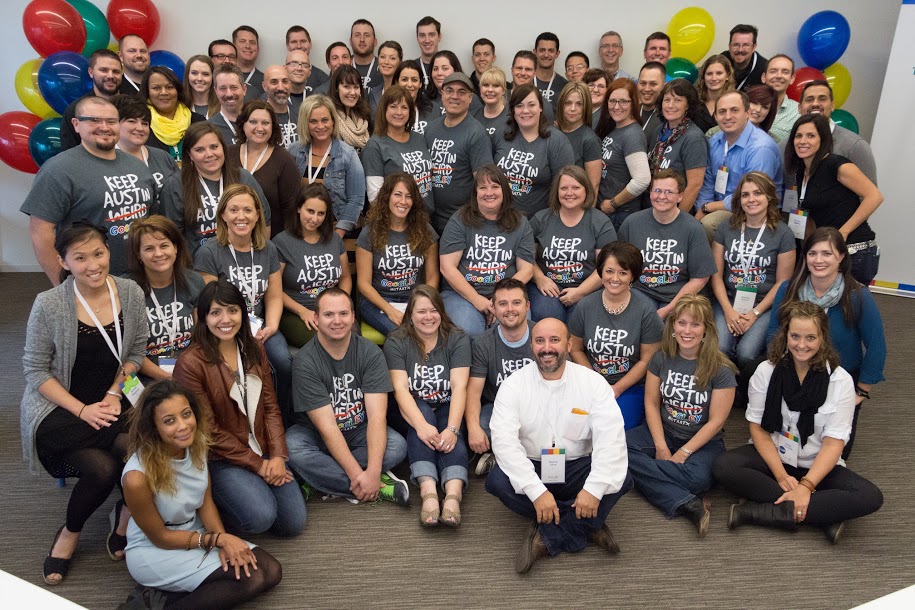
The most recent Google Teacher Academy was held in Austin, TX on Dec 2-3 and I was one of the lucky participants selected to attend. The badge that comes with this event - Google Certified Teacher - is highly sought after by many educators as they yearn to become a part of this exclusive community.

I have to preface this post with the fact that I am not an advocate for badge seeking. Educational badges do very little to tell about the skills that educators actually possess. In fact, becoming a GCT didn’t really require me to fulfill any particular abilities with Google tools at all. Did I know stuff on my own already? Sure, but I learned all of that from Twitter and from attending various conferences such as CUE, ISTE, and GAFE Summits. So why all the hype then?

For me, it was really about getting into that room with the other 50 or so participants that have also been selected for the event. Big thinkers in the educational world with diverse perspectives from all over North America? Yes, please. I could have spent both days just talking to the other attendees and I would have left happy as a clam.

The event consisted of a combination of design thinking, session-based learning, and group activities. Throughout the academy we were exposed to different people and groups depending on what we were doing. I didn’t get to connect with every member of the cohort - not even close - but I’d say I got to talk to about half of them.

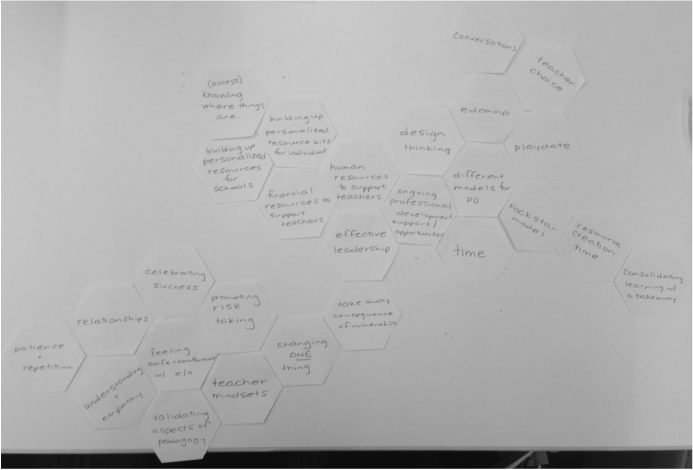
PictureHexagonal thinking - something I found extremely challenging and needed more time for.
Design Thinking

The design thinking aspect of the event blew my mind. After a year of hearing about what design thinking is but never actually getting to go through the process, I finally had the chance. We were challenged to lay out out our educational frustrations, rank and order them, and identify an area with hexagonal thinking in which we could actually affect change or find a solution. Having time to think critically about these problems was very exciting, especially with so many thought leaders sitting right at your table who could help you through the process.


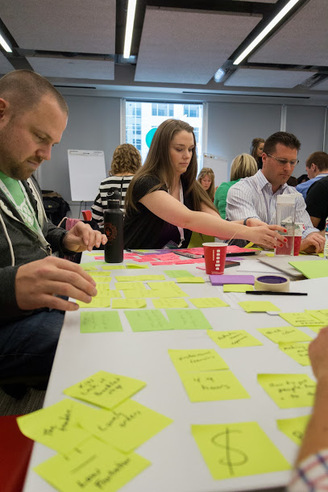
PictureDesign thinking - the beginning. Photo cred: Danny Silva
On the  second day, we had an opportunity to actually brainstorm ideas, create “SMART” goals - those which were specific, measurable, attainable, relevant, and with a time limit. We got to interact with other attendees’ goals and give constructive feedback on how they could reach them. The room was plastered in colourful Post-It notes all emblazened with endless ideas about how to make positive impacts in education, free to adopt or adapt for our own needs. 

Sessions

The sessions were based around advanced Google tools and tips from our lead learners. The lead learners were an incredible group who had a lot to offer. In fact, I attended some of their sessions at the aforementioned conferences, making some of the sessions a repeat of something I’d already done. But that right there is a personal problem. Every one of the sessions had good things to offer and got us exposed to each of the lead learners and their strengths. I could honestly listen to Chris Aviles talk all day about storytelling and data and I stole an amazing amount of presentation tips from Katie Christie and Amy Mayer.

The issue I had was that the sessions were a bit disconnected from the design thinking process that we had been going through. Because of my previous personal experiences with some of the session content, I wish that we’d had the choice of continuing with our design thinking or attending the sessions. The plus was that we got exposed to different lead learners and their strength areas.

PictureSome beautiful people from #TeamFancyFruit winning Amazing Race. Photo cred: Danny Silva
Whole Group Activities

The whole group activities were a vague area for me because I found some more worthwhile than others. We completed challenges that involved intense collaboration and communicate such as the Amazing Race Challenge (Holla, to the winners, #TeamFancyFruit!) or building the longest bridge made of masking tape with our team. These I find useful because they’re very quick and have an ultimate point. 

Others I found to be longer and more drawn out, and sadly, contained answers that I could have Googled myself. Regardless of my opinion, I’m sure many found the whole group activities useful. I would have absolutely used more of that time to interact with smaller groups or individuals, though. But again, just me.


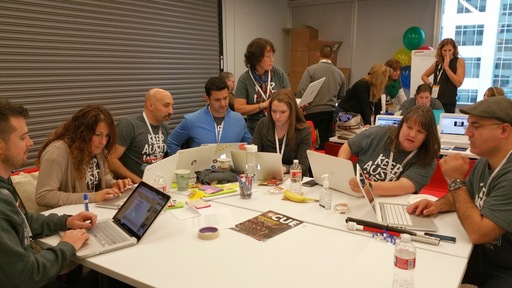
PictureThe entire #GTAATX cohort. Photo cred/Terrifying table balancing cred: Danny Silva

In the End…

The Google Teacher Academy is more than just a badge. I’m coming out from it having consolidated some existing relationships and igniting some new ones. I got to spend a bulk of time discussing some big educational issues with Karl, John, Matt, & Rachel. I got to have a great late-night chat with several others from the cohort, among them Stephanie, Richard, Suzie, James, and Alicia. And most importantly, our cohort finally defined how GAFE is really pronounced (I’m looking at you, short “a” people). For all of you non-believers out there, it’s now called GAFÉ. You will never look at it the same ever again. And you’re welcome.

More seriously, the goals that I set for myself and the design thinking process were the most important aspect of this experience. I can honestly say that these goals are going to be difficult to reach while being enrolled in my Masters program, but as Chris McGee would tell me, I should just say YES. On that note, if someone asked me if I would ever go again, I would say YES!

Thanks to all who supported me in getting to GTA - you know who you are!

Picture
7 Comments
<<Previous
Forward>>

    Author

    Victoria Olson
    A curious and passionate educator in Langley, BC

    Picture

    Picture

    Picture

    Picture

    Picture

    Picture

    Tweets by @MsVictoriaOlson

    Picture

    Picture

    RSS Feed


    Archives

    April 2020
    March 2020
    February 2016
    January 2016
    August 2015
    May 2015
    April 2015
    March 2015
    February 2015
    January 2015
    December 2014
    October 2014
    September 2014
    July 2014
    May 2014
    April 2014
    March 2014
    January 2014
    December 2013
    November 2013
    October 2013
    September 2013
    August 2013
    July 2013
    June 2013
    May 2013
    April 2013


    Categories

    All
    Assessment
    Augmented Reality
    Balance
    Blogging
    Camtasia
    Collaboration
    Communication
    Community
    Creativity
    Design
    Edcamp
    #EdFailFwd
    Education
    Efficiency
    Elementary
    Google Teacher Academy
    Guided Math
    Intermediate
    Ipads
    Multi Age
    Multi-age
    Pln
    Primary
    Pro D
    Pro D
    Pro-D
    Reflection
    Resource
    Screencasting
    Self Regulation
    Sharing
    Tech
    Things That Suck
    Think35
    Twitter
    Video
    #YourEduStory


    Want to subscribe to this blog? Enter your email address below for automatic email updates:

    Enter your email address:

    Delivered by FeedBurner

Powered by Create your own unique website with customizable templates.